Chapter 6: Creating actions, destinations, and bookmarks
Which version?
This Tutorial was written with iText 7.0.x in mind, however, if you go to the linked Examples you will find them for the latest available version of iText. If you are looking for a specific version, you can always download these examples from our GitHub repo (Java/.NET).
When we discussed the Link building block in chapter 3, we created a URI action that opened a web page on IMDB when we clicked the text rendered by the Link object. We briefly mentioned that clickable areas are defined using Link annotations, and we referred to chapter 6 - this chapter - when we explained that createURI() created only one of many types of actions. In the examples that follow, we'll discover some more types, and we'll also learn about different types of destinations that can be used in a link. Finally, we'll also use those actions and destinations to create outlines, better known as bookmarks.
URI actions
If you look at the AbstractAction class, you notice that it has a method named secAction(). When you use this method on a building block, you can define actions that will be triggered when clicking on its content. This is an alternative to using the Link object.
The setAction() method doesn't make sense for every building block. For instance: you can't click an AreaBreak. Please consult the appendix to find out for which objects the setAction() method can be used.
In figure 6.1, we see a PDF that is almost identical to the one we created in chapter 4 when we rendered the entries in our CSV file to a PDF with a numbered list.
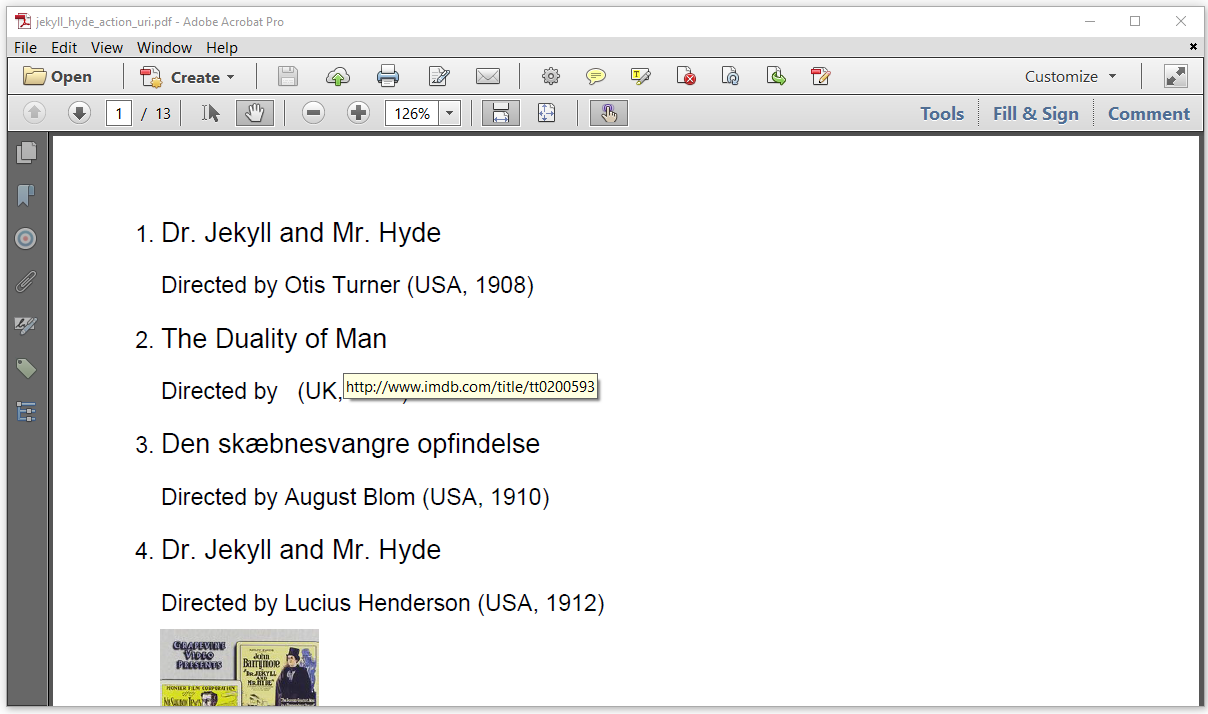
Figure 6.1: using setAction() on a ListItem
In the original example, we used a Link object so that you could jump to the corresponding IMDB page when clicking the title. In the URIAction example, we make the complete ListItem clickable.
List> resultSet = CsvTo2DList.convert(SRC, "|");
resultSet.remove(0);
com.itextpdf.layout.element.List list =
    new com.itextpdf.layout.element.List(ListNumberingType.DECIMAL);
for (List record : resultSet) {
    ListItem li = new ListItem();
    li.setKeepTogether(true);
    li.add(new Paragraph().setFontSize(14).add(record.get(2)))
        .add(new Paragraph(String.format(
            "Directed by %s (%s, %s)",
            record.get(3), record.get(4), record.get(1))));
    File file = new File(String.format(
        "src/main/resources/img/%s.jpg", record.get(0)));
    if (file.exists()) {
        Image img = new Image(ImageDataFactory.create(file.getPath()));
        img.scaleToFit(10000, 120);
        li.add(img);
    }
    String url = String.format(
        "https://www.imdb.com/title/tt%s", record.get(0));
    li.setAction(PdfAction.createURI(url));
    list.add(li);
}
document.add(list);
In line 21, we create a URI action using a link to IMDB and we set the action for the complete list item using the setAction() method.
Named actions
Figure 6.2 shows links that are added to the first and the last page of a similar document. The link on the first page is marked "Go to last page"; the link on the last page is marked "Go to first page", and that's exactly what the links do when you click them.

Figure 6.2: Named actions
We used named actions to achieve this; see the NamedAction example.
Paragraph p = new Paragraph()
    .add("Go to last page")
    .setAction(PdfAction.createNamed(PdfName.LastPage));
document.add(p);
p = new Paragraph()
    .add("Go to first page")
    .setAction(PdfAction.createNamed(PdfName.FirstPage));
document.add(p);
The createNamed() method accepts a PdfName as a parameter. You can use one of the following values:
PdfName.FirstPage- the action allows you to jump to the first page of the document.PdfName.PrevPage- the action allows you to jump to the previous page in the document.PdfName.NextPage- the action allows you to jump to the next page in the document.PdfName.LastPage- the action allows you to jump to the last page of the document.
You could create these names yourself, for instance new PdfName("PrevPage"), but it's always better to use the names that are predefined in the PdfName class.
iText won't check if you pass a parameter that corresponds to one of these four values, because a PDF viewer may support additional, non-standard named actions. However, any document using such a non-standard action isn't portable.
These named actions allow us to navigate through a document, but they are rather limited, aren't they? If we want to create a table of contents that allows us to jump to a specific page, we need a GoTo action.
GoTo actions
Figure 6.3 shows the table of contents of the Jekyll and Hyde story. If we'd click on a line, we'd jump to the corresponding page.
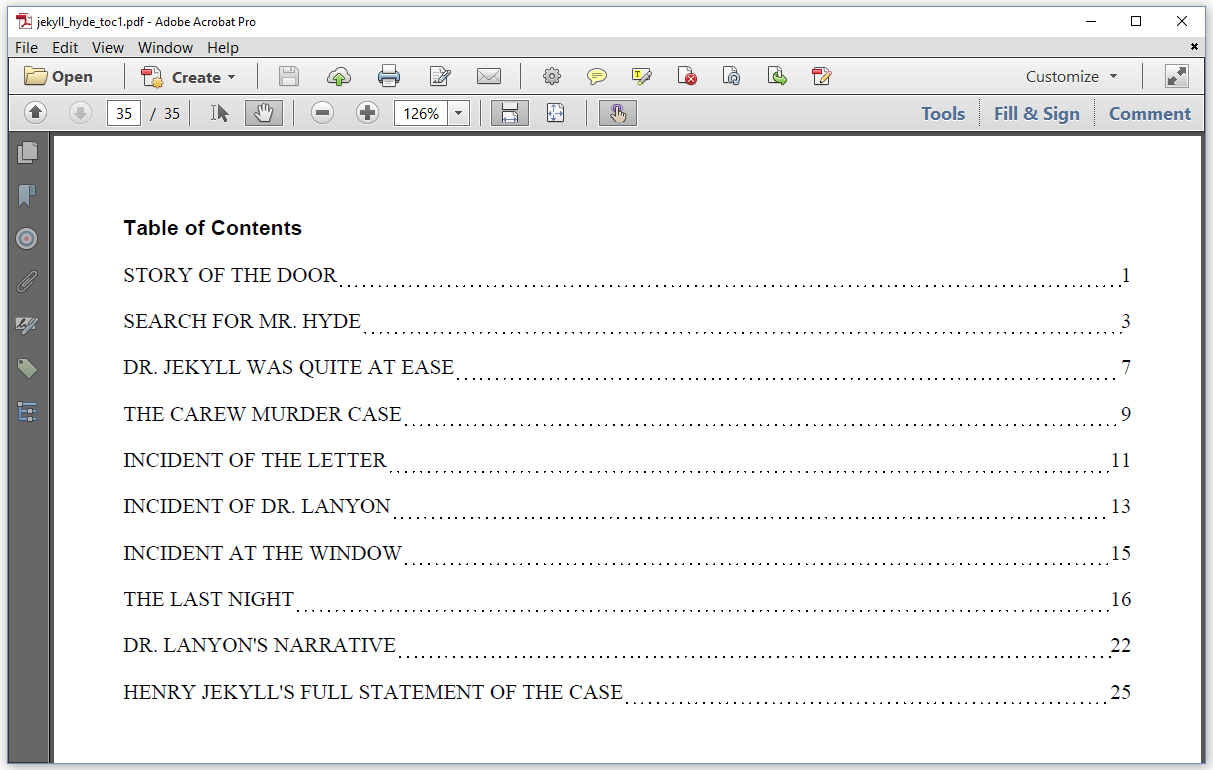
Figure 6.3: A clickable table of contents
To achieve this, we keep track of the titles and the page numbers on which these titles appear. The TOC_GoToPage example shows how.
BufferedReader br = new BufferedReader(new FileReader(SRC));
String name, line;
Paragraph p;
boolean title = true;
int counter = 0;
List> toc = new ArrayList();
while ((line = br.readLine()) != null) {
    p = new Paragraph(line);
    p.setKeepTogether(true);
    if (title) {
        name = String.format("title%02d", counter++);
        p.setFont(bold).setFontSize(12)
            .setKeepWithNext(true)
            .setDestination(name);
        title = false;
        document.add(p);
        toc.add(new SimpleEntry(line, pdf.getNumberOfPages()));
    }
    else {
        p.setFirstLineIndent(36);
        if (line.isEmpty()) {
            p.setMarginBottom(12);
            title = true;
        }
        else {
            p.setMarginBottom(0);
        }
        document.add(p);
    }
}
document.add(new AreaBreak(AreaBreakType.NEXT_PAGE));
p = new Paragraph().setFont(bold).add("Table of Contents");
document.add(p);
toc.remove(0);
List tabstops = new ArrayList();
tabstops.add(new TabStop(580, TabAlignment.RIGHT, new DottedLine()));
for (SimpleEntry entry : toc) {
    p = new Paragraph()
        .addTabStops(tabstops)
        .add(entry.getKey())
        .add(new Tab())
        .add(String.valueOf(entry.getValue()))
        .setAction(PdfAction.createGoTo(
                PdfExplicitDestination.createFit(entry.getValue())));
    document.add(p);
}
Most of the code repeats what we've done before to render the TXT file to a PDF, but these are the new lines that interest us the most:
Line 6: we create an
ArrayListnamedtocthat will contain a series ofSimpleEntrykey-value pair entries. The key is aStringwe'll use for the title. They value is anIntegerwe'll use for the page number.Line 17: each time we add a title to the document (line 10-19), we add a new
SimpleEntryto thetoclist. We get the current page number using thegetNumberOfPage()method.Line 31-33: once the full text is added, we go to a new page. We add a
Paragraphsaying"Table of Contents".Line 34: we remove the first entry of the list, because that's the title of the book, not the title of a chapter.
Line 35-36: we create a list of
TabStopelements. We use aDottedLineas the tab leader.Line 37-46: we loop over all the entries in our
toc. We use the key of each entry as well as the corresponding value to construct aParagraphwith the title and the page number as content. We also use the page number to create a GoTo action that jumps to that specific page.
In line 43, we use the createGoTo() method with a PdfExplicitDestination object as a parameter. The PdfExplicitDestination class extends the PdfDestination class. We'll take a closer look at these classes later on in this chapter. What's more important right now, is that there are two problems with this example, one problem is worse than the other.
The link jumps to another page in the document and shows this page in full. A more elegant solution would be to jump to the start of the actual title. We could use a different
PdfExplicitDestinationto achieve this (for instancecreateFitH()instead ofcreateFit()).The link doesn't always jump to the correct page. We store the page number of the last page in the document at the moment we add the title. That's the page number of the current page. However, we're also using the
setKeepWithNext()method. This method forwards the title to a new page if the first paragraph of the chapter doesn't fit the current page. In that case, our TOC points at the wrong page, more specifically at the page just before the one we need.
We'll fix these two problems in the next example. Instead of an explicit destination, we'll use named destinations for a change.
Named destinations
Figure 6.4 looks almost identical to figure 6.3. The fact that the page numbers are now correct is the only visible difference.
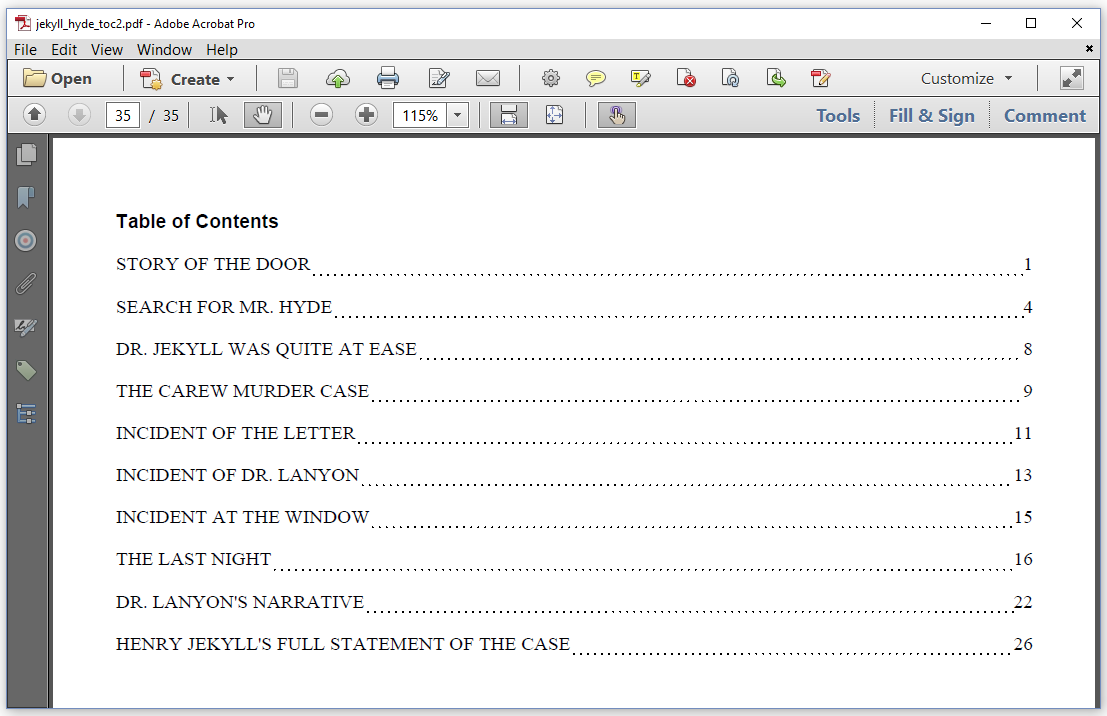
Figure 6.4: A clickable table of contents
The other difference is that we now used named destinations. We create those destinations by using the setDestination() method. This method is defined in the ElementPropertyContainer and can be used on many building blocks (see appendix). In the TOC_GoToNamed example, we use it on a Paragraph.
BufferedReader br = new BufferedReader(new FileReader(SRC));
String name, line;
Paragraph p;
boolean title = true;
int counter = 0;
List>> toc = new ArrayList();
while ((line = br.readLine()) != null) {
    p = new Paragraph(line);
    p.setKeepTogether(true);
    if (title) {
        name = String.format("title%02d", counter++);
        SimpleEntry titlePage
                = new SimpleEntry(line, pdf.getNumberOfPages());
        p.setFont(bold).setFontSize(12)
            .setKeepWithNext(true)
            .setDestination(name)
            .setNextRenderer(new UpdatePageRenderer(p, titlePage));
        title = false;
        document.add(p);
        toc.add(new SimpleEntry(name, titlePage));
    }
    else {
        p.setFirstLineIndent(36);
        if (line.isEmpty()) {
            p.setMarginBottom(12);
            title = true;
        }
        else {
            p.setMarginBottom(0);
        }
        document.add(p);
    }
}
document.add(new AreaBreak(AreaBreakType.NEXT_PAGE));
p = new Paragraph().setFont(bold)
    .add("Table of Contents").setDestination("toc");
document.add(p);
toc.remove(0);
List tabstops = new ArrayList();
tabstops.add(new TabStop(580, TabAlignment.RIGHT, new DottedLine()));
for (SimpleEntry> entry : toc) {
    SimpleEntry text = entry.getValue();
    p = new Paragraph()
        .addTabStops(tabstops)
        .add(text.getKey())
        .add(new Tab())
        .add(String.valueOf(text.getValue()))
        .setAction(PdfAction.createGoTo(entry.getKey()));
    document.add(p);
}
Let's examine what is so different about this example when compared to the previous one.
Line 6: we create an
ArrayListnamedtocthat will contain a series ofSimpleEntrykey-value pair entries. The key is aStringthat we'll use for a unique name. The value is no longer a page number, but anotherSimpleEntry. The key of this second key-value pair will be the title of the chapter; the value will be the corresponding page number.Line 11: we create a unique name for every title:
title00,title01,title03, and so on.Line 12-13: we create a
SimpleEntrynamedtitlePageusing the title as a key and the current page number as the value. We know that this page number will be wrong in some cases. We will use a customParagraphRendererto update the page number.Line 16: we use the unique name as a destination for the
Paragraphusing thesetDestination()method.Line 17: we create an
UpdatePageRendererthat will serve as the renderer for the title paragraph. We pass thetitlePageentry as a parameter so that the renderer can update the page number.Line 20: we add a new
SimpleEntryinstance to thetocobject. This entry contains the unique name and another entry with the title and the page number.Line 34-37: once the full text is added, we go to a new page. We add a
Paragraphsaying"Table of Contents". Note that we define a destination named"toc"for that paragraph (line 36).Line 38: we remove the first entry of the list, because that's the title of the book, not the title of a chapter.
Line 39-40: we create a list of
TabStopelements. We use aDottedLineas the tab leader.Line 41-50: we loop over all the entries in our
toc. We get the value of each entry (line 42) to construct the content of each line in the table of contents: the title (line 45) and the page number (line 47). We make the line clickable by adding a GoTo action that jumps to a location in the document based on a name.
Summarized: we mark a building block using a unique name. Internally, iText will map that name with a specific position - aka an explicit destination - in the document. Because of this, you can use the createGoTo() method passing that name as a parameter to create a link to that specific building block. We will even be able to use that name outside of the PDF document, but let's take a look at the UpdatePageRenderer before we do so.
protected class UpdatePageRenderer extends ParagraphRenderer {
    protected SimpleEntry entry;
    public UpdatePageRenderer(
        Paragraph modelElement, SimpleEntry entry) {
        super(modelElement);
        this.entry = entry;
    }
    @Override
    public LayoutResult layout(LayoutContext layoutContext) {
        LayoutResult result = super.layout(layoutContext);
        entry.setValue(layoutContext.getArea().getPageNumber());
        return result;
    }
}
The entry object contains a title and a page number. That page number could be wrong if the title is moved to the next page. We can only know if that happens when the title paragraph is rendered. Only at that moment, a layout decision will be made. The easiest way to update the page number in the entry object, is to override the layout() method as is done in line 11.
Remote GoTo actions
Figure 6.5 is a PDF with two links marked in blue. When we click on the first link, the PDF we created in the previous example is opened on the first page in a new viewer window. When we click on the second link, the same document is opened on the table of contents page in the current window, replacing the document with the two links.
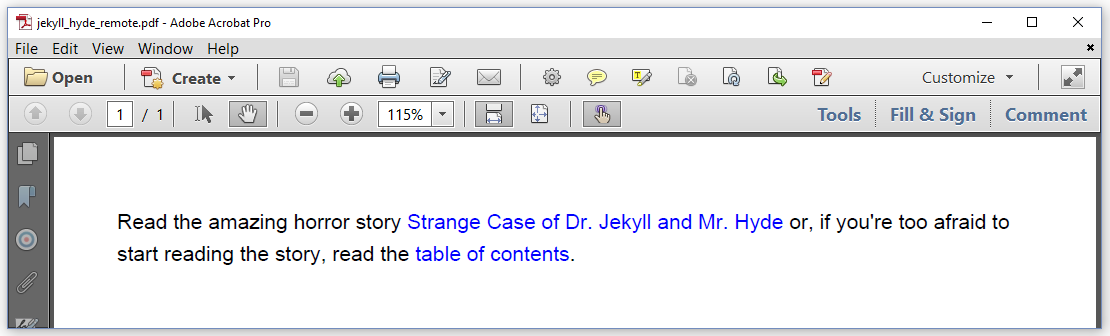
Figure 6.5: Links to named destinations in another PDF document
We use two Link objects to achieve this in the RemoteGoto example.
Link link1 = new Link("Strange Case of Dr. Jekyll and Mr. Hyde",
    PdfAction.createGoToR(
        new File(TOC_GoToNamed.DEST).getName(), 1, true));
Link link2 = new Link("table of contents",
    PdfAction.createGoToR(
        new File(TOC_GoToNamed.DEST).getName(), "toc", false));
Paragraph p = new Paragraph()
    .add("Read the amazing horror story ")
    .add(link1.setFontColor(Color.BLUE))
    .add(" or, if you're too afraid to start reading the story, read the ")
    .add(link2.setFontColor(Color.BLUE))
    .add(".");
document.add(p);
In line 2 and 3, we use the createGoToR() method to create a link to a remote PDF document.
The first parameter is the name of the file we created in the previous example. We expect it to be in the same directory as the file we refer from.
The second parameter is the page number; we want the link to jump to the first page.
The third parameter indicates that we want to open the document in a new PDF viewer window.
In line 5 and 6, we use another createGoToR() method to create a link to a named destination in another document.
The first parameter is the name of the file we created in the previous example.
The second parameter is the name we used when we added the paragraph
"Table of Contents".The third parameter indicates that we want to open the document in the current PDF viewer window.
There are many other variations of the createGoToR() method, but they are all similar to one of the two methods that were just explained.
How can I create a link that opens a PDF in a new browser window or tab?
There's a short answer to this question: you can't open a PDF in a new browser window using PDF syntax.
It is a common misconception that the boolean parameter indicating whether or not the PDF should be opened in the current window or in a new window, can also be used in the context of a browser. This isn't the case. There is a clear separation between the PDF viewer and the browser. The PDF viewer is usually a closed container that doesn't have access to the browser functionality. You shouldn't expect the PDF syntax to have the same capabilities as HTML. Those are two separate technologies.
Talking about HTML: you can use JavaScript in a PDF file that is very similar to the JavaScript you'd use in HTML. Many methods, such as methods that communicate with a server, are restricted, but you also have some extra methods that are specific to PDF. For instance: the JavaScript inside a PDF file has access to an app object that offers some functionality to communicate with the PDF viewer.
JavaScript actions
We won't go into detail regarding the JavaScript functionality in PDF, but we'll create a simple PDF that shows an alert when you click a link; see figure 6.6.
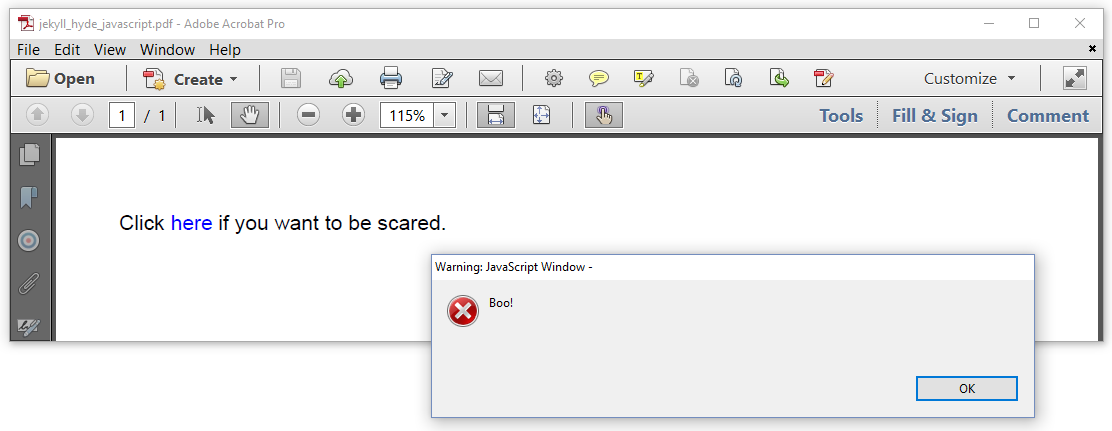
Figure 6.6: A PDF with a JavaScript action
We create the Link that allows us to trigger this alert in the JavaScript example.
Link link = new Link("here",
    PdfAction.createJavaScript("app.alert('Boo!');"));
Paragraph p = new Paragraph()
    .add("Click ")
    .add(link.setFontColor(Color.BLUE))
    .add(" if you want to be scared.");
document.add(p);
In the next example, we'll use the same action, and we'll make it follow by another action.
Chained actions
We've already used several create() convenience methods in the PdfAction class; we've experimented with createURI(), createGoTo(), createGoToR() and so on. If you consult the API documentation for the PdfAction class (Java/.NET), you'll find many more, such as createGoToE() to go to an embedded PDF file, createLaunch() to launch an application. All of these other methods are out of scope in the context of this tutorial, but we'll look at one more action example, the ChainedActions example. It explains how to chain actions.
PdfAction action = PdfAction.createJavaScript("app.alert('Boo');");
action.next(PdfAction.createGoToR(
        new File(C06E04_TOC_GoToNamed.DEST).getName(), 1, true));
Link link = new Link("here", action);
Paragraph p = new Paragraph()
    .add("Click ")
    .add(link.setFontColor(Color.BLUE))
    .add(" if you want to be scared.");
document.add(p);
In line 1, we create the same JavaScript action as in the previous example. We chain a remote GoTo action to this JavaScript action using the next() method in line 2. Now when we click the word "here", a Boo alert will be triggered first; then another PDF will open in a new window.
The createSubmitForm() method is one of the many PdfAction methods we didn't discuss. We mention it here because of a common use case for the next() method. It is not unusual to validate fields that were filled in manually before submitting a form. This validation could be done using JavaScript. The submit action could be the last action in a validation chain.
While we were talking about actions, we mentioned the concept of destinations a couple of times. We also explained that links are actually annotations. In the next couple of examples, we'll spend some more time on these concepts.
Destinations
The PdfDestination class is the abstract superclass of the PdfExplicitDestination, the PdfStringDestination, and the PdfNamedDestination class. The PdfExplicitDestination class can be used to create a destination to a specific page, using specific coordinates if needed. PdfStringDestination and PdfNamedDestination can be used to create a named destination.
What's the difference between PdfStringDestination and PdfNamedDestination?
That's a great question, but the answer might require being read more than once. Both PdfStringDestination and PdfNamedDestination can be used to create a named destination, but:
When we use the
PdfNamedDestinationclass, the name will be stored inside the PDF document as a PDF name object. This is how named destinations were originally stored in PDF 1.1.When we use the
PdfStringDestinationclass, the name will be stored as a PDF string object. This was introduced in PDF 1.2, because a PDF string object offers more possibilities than a name object.
Today, the name of a named destination should be stored as a PDF string, not as a PDF name. The PdfNamedDestination class is offered should you need it, but it is recommended that you use the PdfStringDestination class.
Using a PDF string as name is also the default way used by iText when you use the setDestination() method. We'll discover another way to create named destinations once we discuss bookmarks, but first, we'll create a couple of explicit destinations in the ExplicitDestinations example.
PdfDestination jekyll =
    PdfExplicitDestination.createFitH(1, 416);
PdfDestination hyde =
    PdfExplicitDestination.createXYZ(1, 150, 516, 2);
PdfDestination jekyll2 =
    PdfExplicitDestination.createFitR(2, 50, 380, 130, 440);
document.add(new Paragraph()
        .add(new Link("Link to Dr. Jekyll", jekyll)));
document.add(new Paragraph()
        .add(new Link("Link to Mr. Hyde", hyde)));
document.add(new Paragraph()
        .add(new Link("Link to Dr. Jekyll on page 2", jekyll2)));
document.add(new Paragraph()
    .setFixedPosition(50, 400, 80)
    .add("Dr. Jekyll"));
document.add(new Paragraph()
    .setFixedPosition(150, 500, 80)
    .add("Mr. Hyde"));
document.add(new AreaBreak(AreaBreakType.NEXT_PAGE));
document.add(new Paragraph()
    .setFixedPosition(50, 400, 80)
    .add("Dr. Jekyll on page 2"));
We create three different types of explicit destinations:
Line 1-2: an explicit destination that will go to page 1, and fit that page horizontally at coordinate
y = 416.Line 3-4: an explicit destination that will go to page 1, so that the top-left corner has the coordinate
x = 150; y = 516and the zoom factor is set to 200%.Line 5-6: an explicit destination that will go to page 2, so that at least a rectangle is visible with
x = 50; y = 380as the coordinate of the lower-left corner andx = 130; y = 440as the coordinate of the upper-right corner.
These links are added in lines 7-8, 9-10, and 11-12 respectively. We also add some text that marks the destinations:
Line 13-15: some text at coordinate
x = 50; y = 400which is right below the first explicit destination.Line 16-18: some text at coordinate
x = 150; y = 500, which puts it in the top-left corner of the visible area when we go to the second explicit destination.Line 20-22: some text on the second page at coordinate
x = 50; y = 400, which makes it fit inside the rectangle defined in the third explicit destination.
We've used three different methods to create an explicit destination. The following table lists all the methods that are available to create an explicit destination. The first parameter is always an int referring to a page number, or a PdfPage instance. The other parameters, if any, are all of type float.
Method | Parameters | Description |
|---|---|---|
| - | The page is displayed with its contents magnified just enough to fit the document window, both horizontally and vertically. |
| - | The page is displayed magnified just enough to fit the bounding box of the contents (the smallest rectangle enclosing all of its contents). |
|
| The page is displayed so that the page fits within the document window horizontally (the entire width of the page is visible). The extra parameter specifies the vertical coordinate of the top edge of the page. |
|
| This option is almost identical to |
|
| The page is displayed so that the page fits within the document window vertically (the entire height of the page is visible). The extra parameter specifies the horizontal coordinate of the left edge of the page. |
|
| This option is almost identical to |
|
| The |
|
| The parameters define a rectangle. The page is displayed with its contents magnified just enough to fit this rectangle. If the required zoom factors for the horizontal and the vertical magnification are different, the smaller of the two is used. |
So far, we've created Link objects either by passing a PdfAction object as a parameter, or a PdfDestination. Both these methods create a PdfLinkAnnotation. We could have created that PdfLinkAnnotation ourselves and we could have passed that annotation as a parameter. This allows us to add some extra flavor to the link.
Link annotations
There are two links in the document shown in figure 6.7. One is underlined; the other is marked by a rectangle.
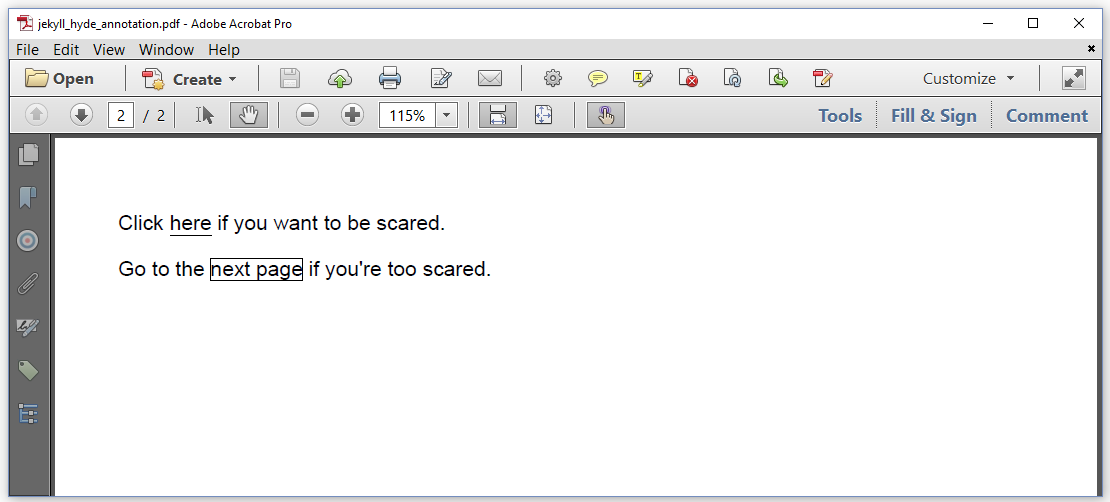
Figure 6.7: Link annotations
This line and rectangle shown in this screen shot are not part of the actual content of the PDF document. They weren't drawn using a sequence of moveTo(), lineTo(), and stroke() methods. They are part of the link annotation, and they are drawn by the PDF viewer that renders annotations on top of the existing content.
Also, when you would click the annotation, you would see a specific behavior. When clicking the first link, the colors would be inverted. When clicking the second link, you'd have a push-down effect. See the Annotation example.
PdfAction js = PdfAction.createJavaScript("app.alert('Boo!');");
PdfAnnotation la1 = new PdfLinkAnnotation(new Rectangle(0, 0, 0, 0))
    .setHighlightMode(PdfAnnotation.HIGHLIGHT_INVERT)
    .setAction(js).setBorderStyle(PdfAnnotation.STYLE_UNDERLINE);
Link link1 = new Link("here", (PdfLinkAnnotation)la1);
document.add(new Paragraph()
    .add("Click ")
    .add(link1)
    .add(" if you want to be scared."));
PdfAnnotation la2 = new PdfLinkAnnotation(new Rectangle(0, 0, 0, 0))
    .setDestination(PdfExplicitDestination.createFit(2))
    .setHighlightMode(PdfAnnotation.HIGHLIGHT_PUSH)
    .setBorderStyle(PdfAnnotation.STYLE_INSET);
Link link2 = new Link("next page", (PdfLinkAnnotation)la2);
document.add(new Paragraph()
    .add("Go to the ")
    .add(link2)
    .add(" if you're too scared."));
We recognize the two links:
We create a JavaScript action in line 1. We use this object as an action for the
PdfLinkAnnotationwe create in line 2. In line 2, we set the highlight mode toHIGHLIGHT_INVERT. This will invert the colors when we click the link. In line 4, we set the border style toSTYLE_UNDERLINE. We use thePdfLinkAnnotationto create aLinkobject in line 5. We add aParagraphwith this link in lines 6 to 9.We create another
PdfLinkAnnotationin line 10. This time we set a destination; see line 11. In line 12, we set the highlight mode toHIGHLIGHT_PUSHto get a push-down effect when we click the link. In line 13, we set the border style toSTYLE_INSET. We create aLinkwith thisPdfLinkAnnotationin line 14. We add anotherParagraphin lines 15 to 18.
We could write a complete tutorial about annotations - and we will -, but whatever will be written in that tutorial is out of scope in this tutorial. We'll finish this chapter with a couple of bookmarks examples.
Outlines aka bookmarks
We've already created a couple of documents that contained a table of contents. This table of contents was added as an extra page, listing the different chapters and the corresponding page numbers. When we clicked a line in this table of contents, we jumped to the corresponding chapter. In figure 6.8, we see a table of contents of a different nature. It's a table of contents that isn't printed when we print the document. We only see it when we open the bookmarks panel in our PDF viewer, and we can use it to easily navigate the document by collapsing items in a tree structure.
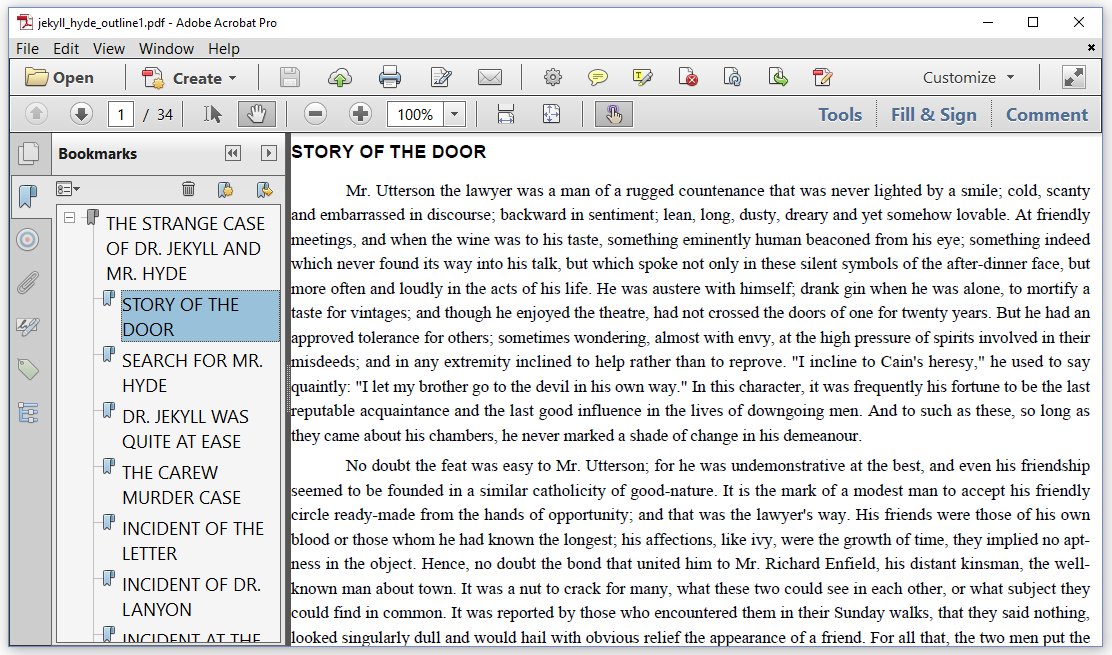
Figure 6.8: Bookmarks using named destinations
This tree structure is called an outline tree. Each branch and leaf of this tree is an outline object. In iText, we create these objects using the PdfOutline class. In the TOC_OutlinesNames example, we use named destinations to jump to each chapter.
BufferedReader br = new BufferedReader(new FileReader(SRC));
String name, line;
Paragraph p;
boolean title = true;
int counter = 0;
PdfOutline outline = null;
while ((line = br.readLine()) != null) {
    p = new Paragraph(line);
    p.setKeepTogether(true);
    if (title) {
        name = String.format("title%02d", counter++);
        outline = createOutline(outline, pdf, line, name);
        p.setFont(bold).setFontSize(12)
            .setKeepWithNext(true)
            .setDestination(name);
        title = false;
        document.add(p);
    }
    else {
        p.setFirstLineIndent(36);
        if (line.isEmpty()) {
            p.setMarginBottom(12);
            title = true;
        }
        else {
            p.setMarginBottom(0);
        }
        document.add(p);
    }
}
We initialize a PdfOutline object in line 6. We create a unique name for each chapter title in line 11. We use this name in line 15 as a destination, and pass it to the createOutline() method to create a PdfOutline that will link to the corresponding destination.
public PdfOutline createOutline(
    PdfOutline outline, PdfDocument pdf, String title, String name) {
    if (outline ==  null) {
        outline = pdf.getOutlines(false);
        outline = outline.addOutline(title);
        outline.addDestination(
            PdfDestination.makeDestination(new PdfString(name)));
        return outline;
    }
    PdfOutline kid = outline.addOutline(title);
    kid.addDestination(PdfDestination.makeDestination(new PdfString(name)));
    return outline;
}
If the outline object passed to the createOutline() method is null, we're at the very beginning of our story. We get the root outline from the PdfDocument and we add an outline to this root object with the first title we encounter. This is the title of our novel "THE STRANGE CASE OF DR. JEKYLL AND MR. HYDE". We want this PdfOutline to be the parent of all the other titles. We use the makeDestination() method using a PdfString object. This is equivalent to creating a PdfStringDestination using a String instance. We do more or less the same for the other titles.
When we create a destination using the setDestination() method, iText creates an XYZ destination using the top-left coordinate of the corresponding building block and a zoom factor of 100%. This creates the awkward effect that we no longer see the margin when we click on one of the bookmarks. We can fix this by creating explicit destinations. See figure 6.9.
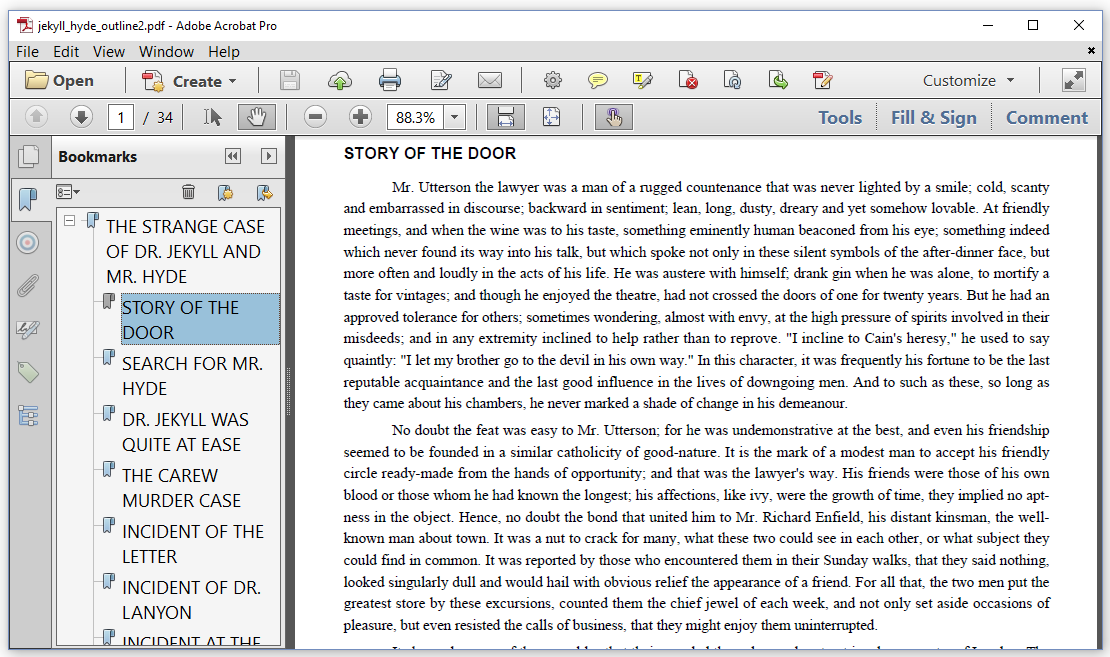
Figure 6.9: Bookmarks using explicit destinations
We remember from the previous table of contents example for which we used explicit destinations that it's easy to point to the wrong page. Once again, we'll use a renderer to make sure we link to the correct page. See the TOC_OutlinesDestinations example.
BufferedReader br = new BufferedReader(new FileReader(SRC));
String line;
Paragraph p;
boolean title = true;
PdfOutline outline = null;
while ((line = br.readLine()) != null) {
    p = new Paragraph(line);
    p.setKeepTogether(true);
    if (title) {
        outline = createOutline(outline, pdf, line, p);
        p.setFont(bold).setFontSize(12)
            .setKeepWithNext(true);
        title = false;
        document.add(p);
    }
    else {
        p.setFirstLineIndent(36);
        if (line.isEmpty()) {
            p.setMarginBottom(12);
            title = true;
        }
        else {
            p.setMarginBottom(0);
        }
        document.add(p);
    }
}
This code snippet is shorter than the previous one because we don't have to create a name and we don't have to set that name as a destination. The main difference is in the createOutline() method. It now looks like this:
public PdfOutline createOutline(
    PdfOutline outline, PdfDocument pdf, String title, Paragraph p) {
    if (outline ==  null) {
        outline = pdf.getOutlines(false);
        outline = outline.addOutline(title);
        return outline;
    }
    OutlineRenderer renderer = new OutlineRenderer(p, title, outline);
    p.setNextRenderer(renderer);
    return outline;
}
We use the first title we encounter (when outline == null) as the top-level outline in the outline tree. We create an OutlineRenderer to add the links to the kids of this top-level outline.
protected class OutlineRenderer extends ParagraphRenderer {
    protected PdfOutline parent;
    protected String title;
    public OutlineRenderer(
        Paragraph modelElement, String title, PdfOutline parent) {
        super(modelElement);
        this.title = title;
        this.parent = parent;
    }
    @Override
    public void draw(DrawContext drawContext) {
        super.draw(drawContext);
        Rectangle rect = getOccupiedAreaBBox();
        PdfDestination dest =
            PdfExplicitDestination.createFitH(
                drawContext.getDocument().getLastPage(),
                rect.getTop());
        PdfOutline outline = parent.addOutline(title);
        outline.addDestination(dest);
    }
}
In this case, we override the draw() method. We create a PdfOutline object with the top-level outline as parent (line 18), and we use the top y coordinate of the area occupied by the Paragraph as the top parameter for an explicit destination that fits the page horizontally (line 14-17) as the destination for that newly created outline (line 19).
If you study both examples carefully, you'll discover that the top-level outline of the example using named destination can be clicked to jump to the title of the novel. This isn't the case in the example in which we create explicit destinations: we only created destinations for the titles of the chapters, not for the title of the novel. The PdfOutline objects in an outline tree don't need to be real bookmarks. They don't have to point to a destination on a specific page in the document. They can point to nowhere; they can also be used to trigger an action. We'll make one more bookmark example to demonstrate this. Additionally, we'll change the color and style of the elements in the bookmarks panel.
Color and style of the outline elements.
In figure 6.10, we have a PDF document with a single blank page.
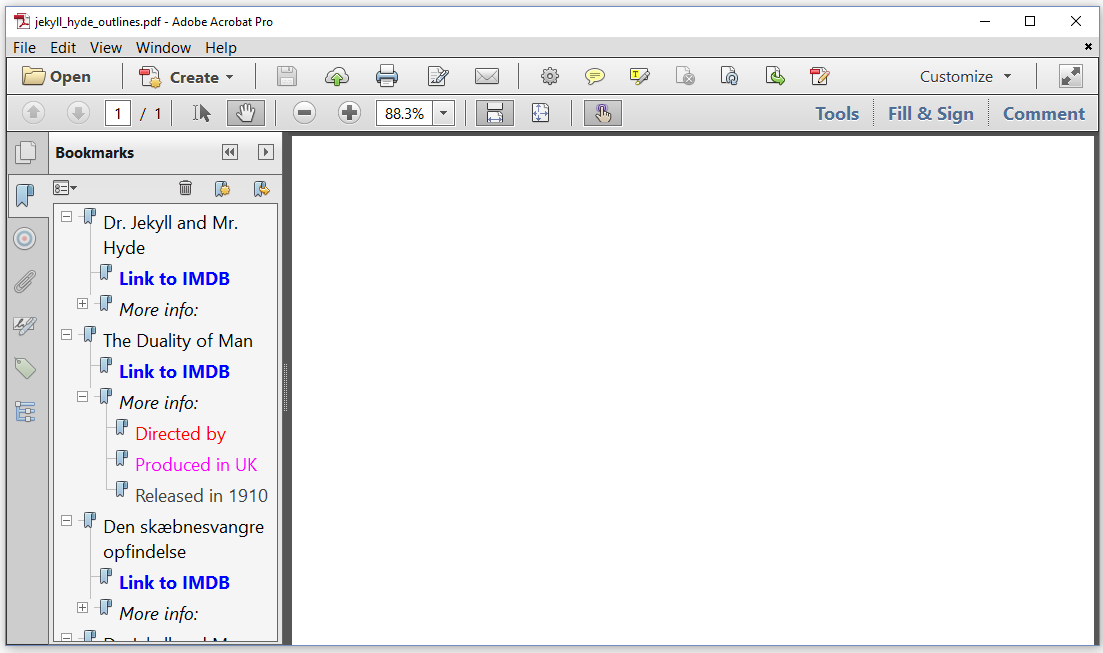
Figure 6.10: Example of an outline tree without actual bookmarks
When we open the bookmark panel, we see an outline tree of which all first-level elements are titles of a movie, cartoon or video. These outlines are the parent of two kids:
One shows "Link to IMDB" in bold and blue. When we click that outline, an URI action is triggered that brings us to the corresponding web page.
The other reads as "More info:" in italic. It is closed by default, but when we open it, we see information in different colors about the director, the country where the movie was produced, and its release data.
None of these PdfOutline objects point to a location in the document. The Outlines example shows how this outline tree was built.
public void createPdf(String dest) throws IOException {
    PdfDocument pdf = new PdfDocument(new PdfWriter(dest));
    pdf.addNewPage();
    pdf.getCatalog().setPageMode(PdfName.UseOutlines);
    PdfOutline root = pdf.getOutlines(false);
    List> resultSet = CsvTo2DList.convert(SRC, "|");
    resultSet.remove(0);
    for (List record : resultSet) {
        PdfOutline movie = root.addOutline(record.get(2));
        PdfOutline imdb = movie.addOutline("Link to IMDB");
        imdb.setColor(Color.BLUE);
        imdb.setStyle(PdfOutline.FLAG_BOLD);
        String url = String.format(
            "https://www.imdb.com/title/tt%s", record.get(0));
        imdb.addAction(PdfAction.createURI(url));
        PdfOutline info = movie.addOutline("More info:");
        info.setOpen(false);
        info.setStyle(PdfOutline.FLAG_ITALIC);
        PdfOutline director = info.addOutline("Directed by " + record.get(3));
        director.setColor(Color.RED);
        PdfOutline place = info.addOutline("Produced in " + record.get(4));
        place.setColor(Color.MAGENTA);
        PdfOutline year = info.addOutline("Released in " + record.get(1));
        year.setColor(Color.DARK_GRAY);
    }
    pdf.close();
}
Let's go through this code step by step:
We create a
PdfDocument(line 2) to which we add a single page (line 3). We change the page mode so that the bookmarks panel is opened by default (line 4). We'll learn more about page mode, layout mode and other viewer preferences in the next chapter.We get the root object of the outline tree (line 5). The
booleanparameter indicates if iText needs to update the outlines. Iftrue, the method will read the whole document and create the outline tree. This isn't necessary here, we can just get the cached outline tree. As we have just created thePdfDocumentthere aren't any outlines in that tree yet anyway.We create a list with all the records in our Jekyll and Hyde movie database (line 6) and we remove the record with the field names (line 7). We loop over the different records (line 8 - 25).
Each movie gets its own outline containing its title (line 9).
We add a first child outline with as title "Link to IMDB" (line 10). We change the color of this title to blue (line 11) and bold (line 12). We add a URI action that jumps to the movie page for that specific movie on IMDB (line 13-15).
We add a second child outline with as title "More info:" (line 16). By default all the outlines we create are open; in this case, we want the outline to be closed (line 17). We change the style to italic (line 18). Finally we add three children to this outline: the director (line 19) as red text (line 20), the country (line 21) as magenta text (line 22), and the year (line 23) as dark gray text (line 24).
Finally, we close the
PdfDocument(line 26).
This example shows how you can easily create an outline tree with different branches, branches of branches, and leaves. It also shows how you can change the color and style of an element in the outline tree, and how you can change the open or closed status of each outline element.
Summary
This chapter was all about interactive elements that help us navigate through and between documents. We started by experimenting with a series of actions:
URI actions to navigate to external web pages,
Named actions to navigate to the first page, previous page, next page, and last page,
GoTo actions to go to a named destination or an explicit destination inside the document,
Remote GoTo action to navigate to another PDF document in the same or in a new window,
JavaScript actions to trigger the execution of PDF-specific JavaScript.
We took a close look at destinations, and how to create them using one of the subclasses of the abstract PdfDestination class.
After we learned that links are stored inside a PDF as annotations, we looked at some bookmark examples. We learned how to create an outline tree, and we used the setDestination() method to jump to a destination inside the document, the setAction() method to trigger an action, and none of these to create an inert hierarchical entry in the outline tree.
We already saw a glimpse of the next chapter, when we changed the page mode to make sure the bookmarks panel was opened when opening the document. Viewer preferences will be one of the topics we'll discuss next, but first we'll learn more about the concept of event handling.