Chapter 2: Adding content to a Canvas or a Document
Which version?
This Tutorial was written with iText 7.0.x in mind, however, if you go to the linked Examples you will find them for the latest available version of iText. If you are looking for a specific version, you can always download these examples from our GitHub repo (Java/.NET).
Throughout this tutorial, we'll be creating PDF documents by adding BlockElement and Image objects to a RootElement instance. RootElement is an abstract class with two subclasses: Document and Canvas:
Documentis the default root element when creating a self-sufficient PDF. It manages high-level operations such as setting page size and rotation, adding elements, and writing text at specific coordinates. It has no knowledge of the actual PDF concepts and syntax. A Document's rendering behavior can be modified by extending theDocumentRendererclass and setting an instance of this custom renderer with thesetRenderer()method.Canvasis used for addingBlockElementandImagecontent inside a specific rectangle defined using absolute positions on aPdfCanvas.Canvashas no knowledge of the concept of a page and content that doesn't fit the rectangle will be lost. This class acts as a bridge between the high-level layout API and the low-level kernel API.
In the previous chapter, we've already used the Document class. Let's start this chapter with some Canvas examples.
Using Canvas to add content inside a Rectangle
In figure 2.1, we see a rectangle drawn using the low-level API. Inside this rectangle, we've added some text. This text was added using the Canvas object.
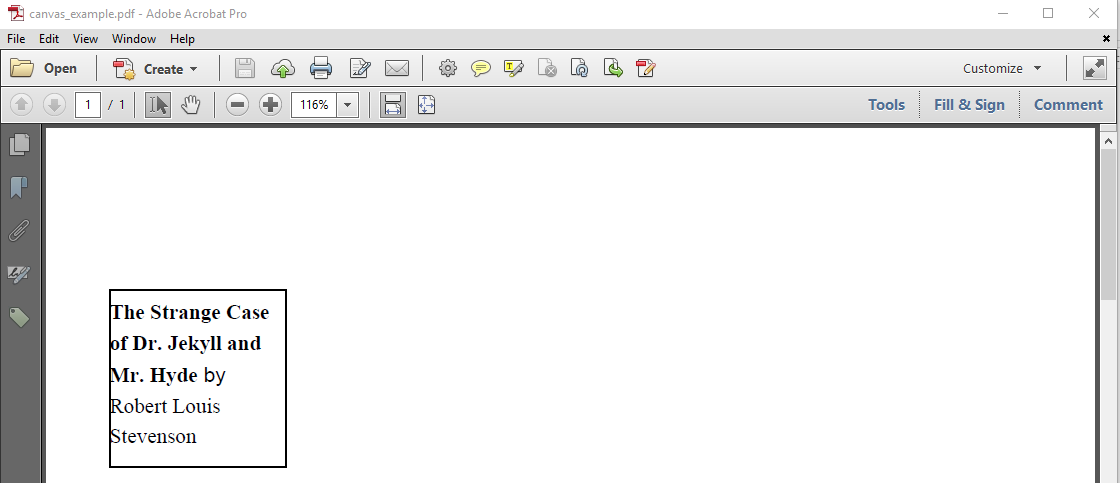
Figure 2.1: Adding text inside a rectangle
The CanvasExample shows how it's done.
PdfDocument pdf = new PdfDocument(new PdfWriter(dest));
PdfPage page = pdf.addNewPage();
PdfCanvas pdfCanvas = new PdfCanvas(page);
Rectangle rectangle = new Rectangle(36, 650, 100, 100);
pdfCanvas.rectangle(rectangle);
pdfCanvas.stroke();
Canvas canvas = new Canvas(pdfCanvas, pdf, rectangle);
PdfFont font = PdfFontFactory.createFont(FontConstants.TIMES_ROMAN);
PdfFont bold = PdfFontFactory.createFont(FontConstants.TIMES_BOLD);
Text title =
   new Text("The Strange Case of Dr. Jekyll and Mr. Hyde").setFont(bold);
Text author = new Text("Robert Louis Stevenson").setFont(font);
Paragraph p = new Paragraph().add(title).add(" by ").add(author);
canvas.add(p);
canvas.close();
pdf.close();
Let's examine what happens in this code snippet:
Line 1: we define a
PdfDocument,Line 2: we don't use a
Documentobject, so we have to create eachPdfPagein our own code,Line 3: we use this
PdfPageto create aPdfCanvas,Line 4: we define a rectangle,
Line 5-6: we draw the rectangle using the low-level API,
Line 7: we create a
Canvasobject using thePdfPage, thePdfDocumentand the rectangle,Line 8-13: we create a
Paragraph; this code is identical to what we had in the previous chapter,Line 14: we add the
Paragraphto theCanvas.Line 15: we close the
Canvas.Line 16: we close the
PdfDocument.
Looking at this example, it's not hard to understand the use case. If you need to add content on a specific page at a specific rectangular location, you can create a Canvas object passing that page and that rectangle as a parameter. When you add content to that object, that content will be rendered inside the boundaries of that rectangle.
It's important to understand that all the content that doesn't fit the rectangle will be cut. See figure 2.2.
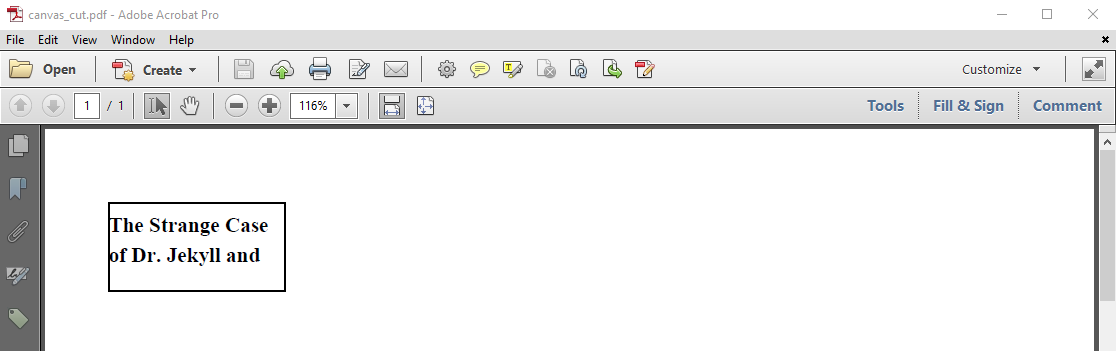
Figure 2.2: Adding text that doesn't fit a rectangle
In the CanvasCut example, we add the same content to a smaller rectangle.
Rectangle rectangle = new Rectangle(36, 750, 100, 50);
Canvas canvas = new Canvas(pdfCanvas, pdf, rectangle);
PdfFont font = PdfFontFactory.createFont(FontConstants.TIMES_ROMAN);
PdfFont bold = PdfFontFactory.createFont(FontConstants.TIMES_BOLD);
Text title =
    new Text("The Strange Case of Dr. Jekyll and Mr. Hyde").setFont(bold);
Text author = new Text("Robert Louis Stevenson").setFont(font);
Paragraph p = new Paragraph().add(title).add(" by ").add(author);
canvas.add(p);
canvas.close();
In this snippet, we add the exact same content as before, but instead of new Rectangle(36, 650, 100, 100), we reduced the height from 100 to 50: new Rectangle(36, 750, 100, 50). As a result, the text no longer fits the rectangle. The part that says "Mr. Hyde by Robert Louis Stevenson" got lost. No exception gets thrown because this is expected behavior.
Text getting cut without warning isn't always what you want. In some cases, you need to know if the content fits the rectangle or not. For instance, in figure 2.3, we have defined a larger rectangle to which we've added the Paragraph as many times as possible.
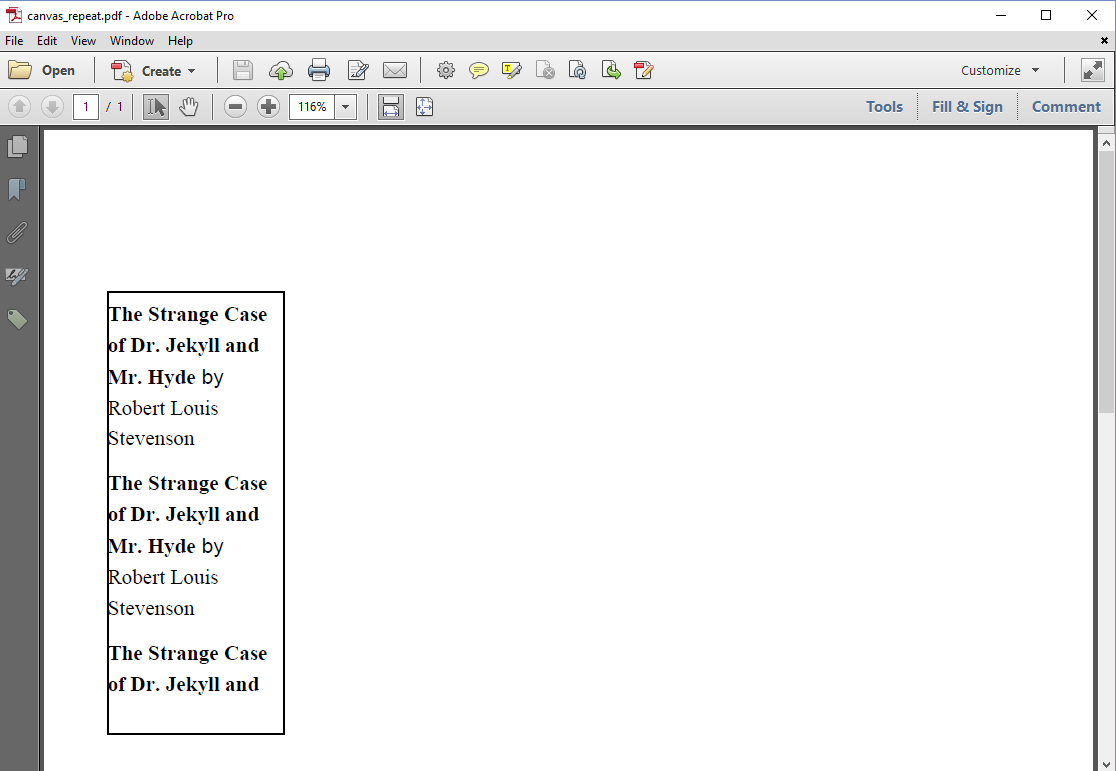
Figure 2.3: Filling a rectangle with text
We've added the Paragraph three times, because we can fit it inside the rectangle almost two and a half times. How did we know this? Let's take a look at the CanvasRepeat example.
First we extended the CanvasRenderer:
class MyCanvasRenderer extends CanvasRenderer {
    protected boolean full = false;

    private MyCanvasRenderer(Canvas canvas) {
        super(canvas);
    }

    @Override
    public void addChild(IRenderer renderer) {
        super.addChild(renderer);
        full = Boolean.TRUE.equals(getPropertyAsBoolean(Property.FULL));
    }

    public boolean isFull() {
        return full;
    }
}
We introduced a member-variable full that indicates if the rectangle was completely filled or not. Each time a child is added to the renderer, we check the status of the FULL property. This status can be null, false or true. If it's true, there is no more space left to add content. We also added an isFull() method for our convenience.
Rectangle rectangle = new Rectangle(36, 500, 100, 250);
Canvas canvas = new Canvas(pdfCanvas, pdf, rectangle);
MyCanvasRenderer renderer = new MyCanvasRenderer(canvas);
canvas.setRenderer(renderer);
PdfFont font = PdfFontFactory.createFont(FontConstants.TIMES_ROMAN);
PdfFont bold = PdfFontFactory.createFont(FontConstants.TIMES_BOLD);
Text title =
   new Text("The Strange Case of Dr. Jekyll and Mr. Hyde").setFont(bold);
Text author = new Text("Robert Louis Stevenson").setFont(font);
Paragraph p = new Paragraph().add(title).add(" by ").add(author);
while (!renderer.isFull())
   canvas.add(p);
canvas.close();
The Rectangle we define in line 1 is larger than what we had before. Line 3 and 4 are new. We create an instance of our custom renderer and we declare this renderer to the Canvas object. In line 11 and 12, we add the Paragraph as many times as possible as long as the Canvas we've defined isn't completely full.
One might wonder why we are adding the border of the rectangle using the low-level rectangle menu. The abstract RootElement extends the abstract ElementPropertyContainer class. The ElementPropertyContainer class defines methods such as setBorder() and setBackgroundColor(), but these methods can't be used because setting a border or a background isn't implemented for Canvas, nor for Document. Not every method defined in ElementPropertyContainer makes sense for all of its subclasses. For instance: it doesn't make sense to implement the setFont() method for an Image object. You can check which methods are implemented for the Canvas and Document class in Appendix C.
In figure 2.4, we created a document with two pages, but there's something special about it: we added content under the existing content of the first page after we added content to the second page.
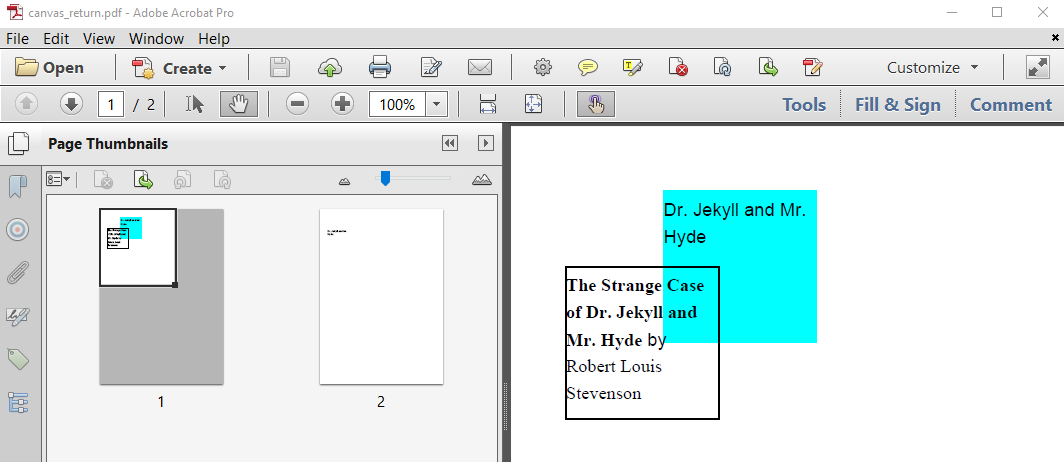
Figure 2.4: Adding content to the previous page
The first part of the code, is identical to what we had in the first example: we define a first page and a rectangle, we create a Canvas instance with this page and this rectangle. Then we define a Paragraph and we add this Paragraph to the canvas. The following code snippet taken from the CanvasReturn example shows how we create a second page and add some content to that page.
PdfPage page2 = pdf.addNewPage();
PdfCanvas pdfCanvas2 = new PdfCanvas(page2);
Canvas canvas2 = new Canvas(pdfCanvas2, pdf, rectangle);
canvas2.add(new Paragraph("Dr. Jekyll and Mr. Hyde"));
canvas2.close();
We add a new page to the document with the addNewPage() method (line 1). We create a new PdfCanvas object with that page (line 2) and a new Canvas object using that new PdfCanvas, the PdfDocument and the Rectangle we used for the first page (line 3). We add a Paragraph to that new Canvas.
This is pretty straightforward, but now look what happens next:
PdfPage page1 = pdf.getFirstPage();
PdfCanvas pdfCanvas1 = new PdfCanvas(
   page1.newContentStreamBefore(), page1.getResources(), pdf);
rectangle = new Rectangle(100, 700, 100, 100);
pdfCanvas1.saveState()
       .setFillColor(Color.CYAN)
       .rectangle(rectangle)
       .fill()
       .restoreState();
Canvas canvas = new Canvas(pdfCanvas1, pdf, rectangle);
canvas.add(new Paragraph("Dr. Jekyll and Mr. Hyde"));
canvas.close();
In line 1, we create a PdfPage instance for the first page using the getFirstPage() method.
The getFirstPage() method is a custom version of the getPage() method. The getPage() method allows you to get access to any page that was created before as long as the PdfDocument hasn't been closed.
In line 2 and 3, we create a PdfCanvas object using the following parameters:
a
PdfStreaminstance: a page consists of one or more content streams. In this case, we want to add content under the existing content, hence we use thenewContentStreamBefore()method. If you want to add content on top of existing content, you should use thenewContentStreamAfter()object. These methods create a new content stream, and add it to the page. You can also get access to existing content streams. The methodgetContentStreamCount()will tell you of how many content streams the page content consists. There's agetContentStream()method that allows you to get a specific content stream based on its index. There's also agetFirstContentStream()and agetLastContentStream()method.a
PdfResourcesinstance: the content stream on its own isn't sufficient to render a page. Each page refers to resources such as fonts and images. When adding content to that page, we'll need to reuse and update these resources.the
PdfDocumentinstance: this is the low-levelPdfDocumentwe're working with.
In line 4, we define a rectangle. We paint that rectangle in Cyan in lines 5 to 9. In line 10 and 11, we create a Canvas object to which we add a Paragraph.
Being able to go back to a previous page and to add content to that page is one of the new, powerful features in iText 7. The architecture of iText 5 didn't allow us to change the content of "completed" pages. This is one of the many reasons why we decided to rewrite iText from scratch.
So far, we have been using the Canvas class to add content to a PdfCanvas. In chapter 7, we'll discover another use case: you can also create a Canvas to add content to a PdfFormXObject. A form XObject is an object that is external to any page content stream. It represents a stream of PDF content that can be referred to more than once from the same page, or from different pages. It's a stream of reusable PDF syntax. The Canvas objects allows you to create that PDF syntax without any hassle.
It's high time that we create a PDF with the full Jekyll and Hyde story instead of merely adding the title and the author to a page. We'll use the Document class to achieve this.
Converting text to PDF with the Document class
Figure 2.5 shows a text file with the full Jekyll and Hyde story: jekyll_hyde.txt
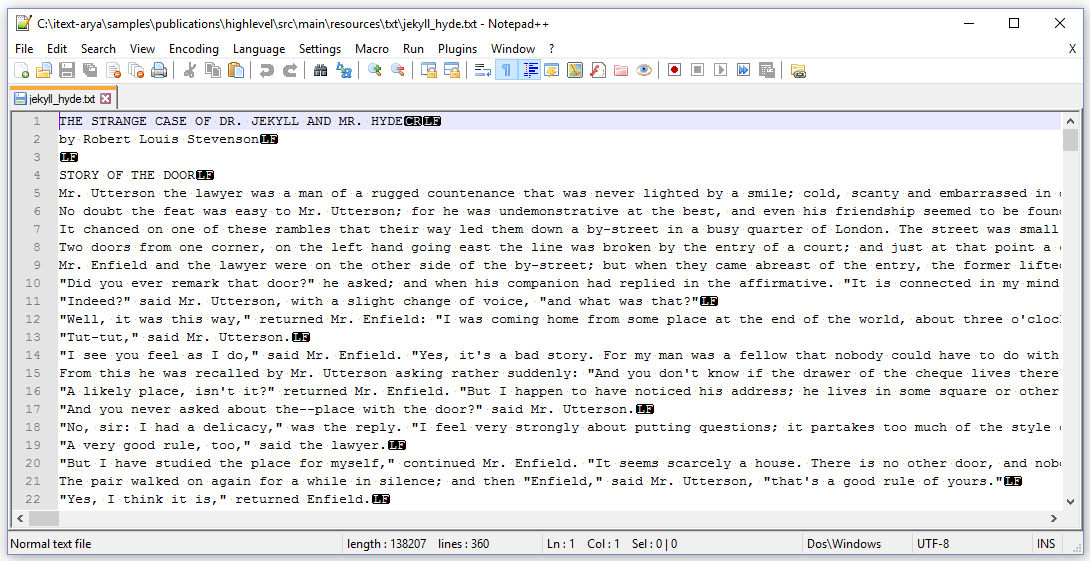
Figure 2.5: Text file with the Jekyll and Hyde story
We'll convert this txt file to a PDF multiple times in the next handful of examples. We'll start by creating the PDF shown in figure 2.6.
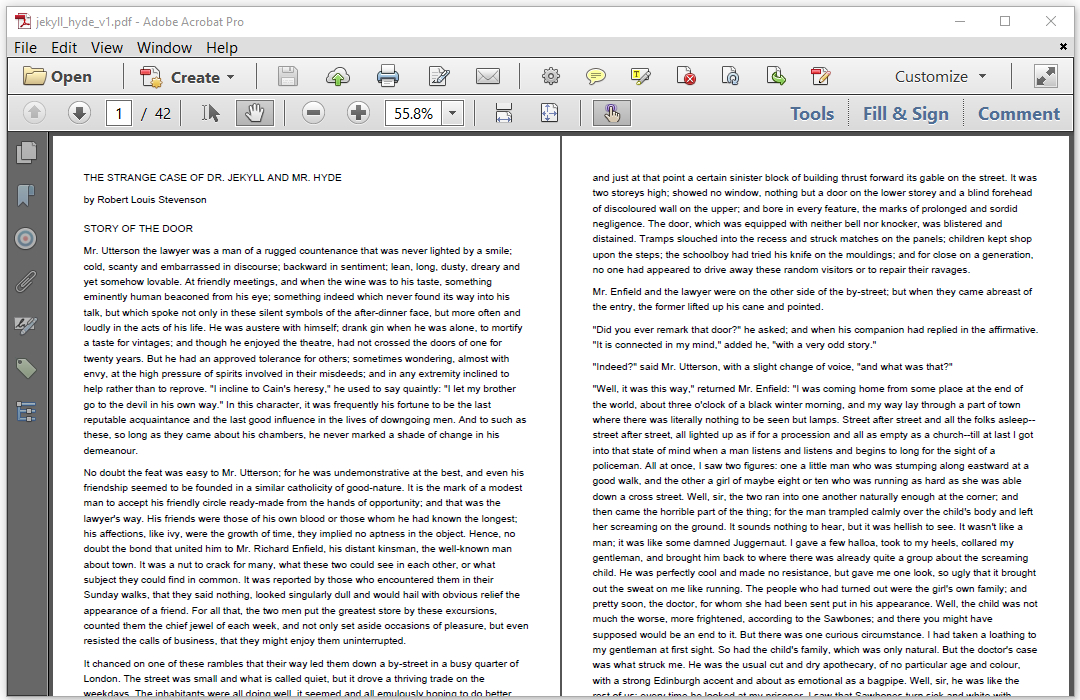
Figure 2.6: First attempt to convert txt to PDF
The JekyllHydeV1 example is very simple. You don't need any new functionality that hasn't been discussed before:
PdfDocument pdf = new PdfDocument(new PdfWriter(dest));
Document document = new Document(pdf);
BufferedReader br = new BufferedReader(new FileReader(SRC));
String line;
while ((line = br.readLine()) != null) {
   document.add(new Paragraph(line));
}
document.close();
In line 1, we create the low-level PdfDocument object. In line 2, we create the high-level Document instance. We create a BufferedReader to read the txt file in line 3. We read every line in the text file in a loop in lines 4 to 7. In line 6, we wrap every line inside a Paragraph object, which we add to the Document object. In line 8. we close the document. The result is a 42-page PDF with the full story of "The Strange Case of Dr. Jekyll and Mr. Hyde."
While this result is already nice, we can do better. The first thing that jumps to the eye in figure 2.7 is the fact that we changed the alignment. Instead of the default left alignment, the text is now justified on both sides of the page. If you take a closer look, you'll also notice that we've introduced hyphenation.
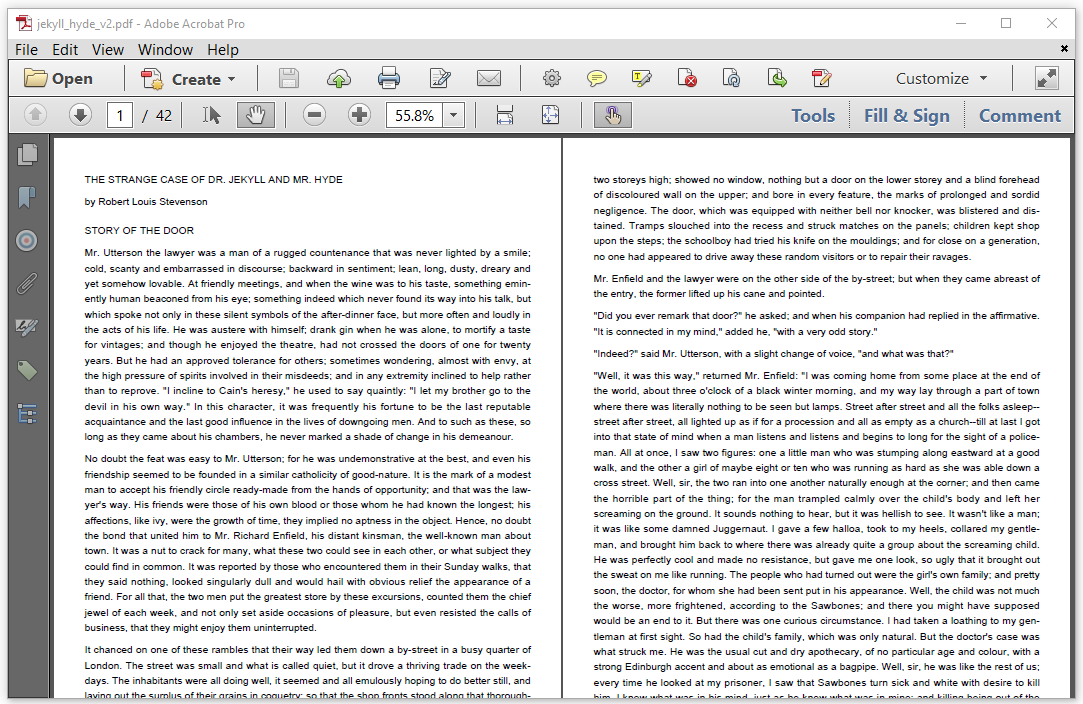
Figure 2.7: Second attempt to convert txt to PDF
For the JekyllHydeV2 example, we copied the first example, and we added the following lines:
document.setTextAlignment(TextAlignment.JUSTIFIED)
   .setHyphenation(new HyphenationConfig("en", "uk", 3, 3));
We used the setTextAlignment() to change the default alignment at the Document level. We used the setHyphenation() method to define the hyphenation rules. In this case, we created a HyphenationConfig object to treat the text as British English. When splitting a word, we indicated that we want at least 3 characters before the hyphenation point and at least 3 characters after the hyphenation point. This means that the word "elephant" can't be hyphenated as "e-lephant" because "e" is shorter than 3 characters; we need to split the word like this instead: "ele-phant". The word "attitude" can't be hyphenated as "attitu-de" because "de" is shorter than 3 characters, in this case we need something like "atti-tude".
Changing defaults at the Document level, such as the default alignment, the default hyphenation, or even the default font, wasn't possible in iText 5. You had to define all of these properties at the level of the separate building blocks. In iText 7, we introduced the inheritance of properties. The default font is still Helvetica, but we can now define a different font at the Document level.
If you do not see the text being properly hyphenated please make sure you have the hyph package installed in your pom.xml or by downloading the jar.
<dependency>
   <groupId>com.itextpdf</groupId>
   <artifactId>hyph</artifactId>
   <version>${iText_Version}</version>
</dependency>
Figure 2.8 shows our third attempt to convert the txt file to a PDF. We changed the font from 12 pt Helvetica to 11 pt Times-Roman. As a result, the page count was reduced from 42 pages to only 34.
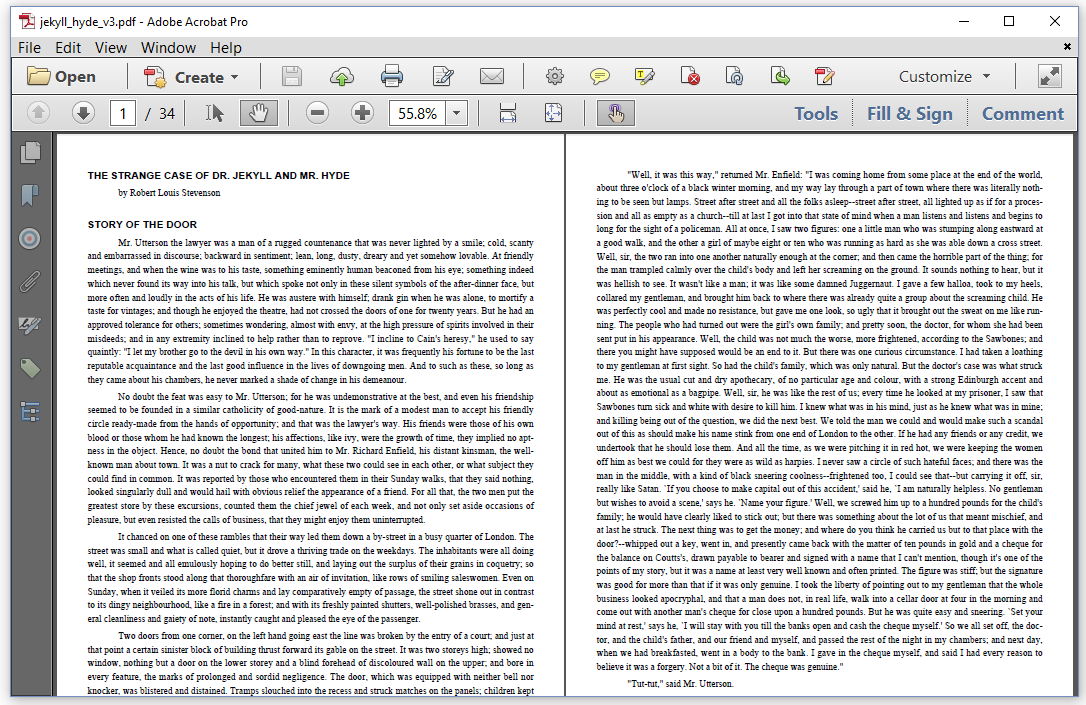
Figure 2.8: Third attempt to convert txt to PDF
When we look at the JekyllHydeV3 example, we see that two different fonts are used:
Document document = new Document(pdf);
PdfFont font = PdfFontFactory.createFont(FontConstants.TIMES_ROMAN);
PdfFont bold = PdfFontFactory.createFont(FontConstants.HELVETICA_BOLD);
document.setTextAlignment(TextAlignment.JUSTIFIED)
   .setHyphenation(new HyphenationConfig("en", "uk", 3, 3))
   .setFont(font)
   .setFontSize(11);
Times-Roman is used as the default font, but we also define Helvetica-Bold for the titles. The txt file was conceived in such a way that the first line of the text file is the title of the book. Every other title in the story is preceded by an empty line. Every line that isn't a title, is a full paragraph. Knowing this, we can adapt the loop that reads the text file line by line.
BufferedReader br = new BufferedReader(new FileReader(SRC));
String line;
Paragraph p;
boolean title = true;
while ((line = br.readLine()) != null) {
   p = new Paragraph(line);
   p.setKeepTogether(true);
   if (title) {
      p.setFont(bold).setFontSize(12);
       title = false;
   }
   else {
      p.setFirstLineIndent(36);
   }
   if (line.isEmpty()) {
       p.setMarginBottom(12);
       title = true;
   }
   else {
       p.setMarginBottom(0);
   }
  document.add(p);
}
This code snippet is a tad more complex than what we had before, but let's walk through it step by step:
We introduce a Boolean
title(line 4) which we initalize astruebecause we know that the first line in the text file is a title. We create aParagraphfor each line (line 6) and we use thesetKeepTogether()method because we don't want iText to distribute paragraphs over different pages (line 7). If aParagraphdoesn't fit the current page, it will be forwarded to the next page unless theParagraphdoesn't fit the next page either. In that case will be split anyway: part of it will be added to the current page and the rest will be forwarded to the next page –or pages.If value of
titleistrue, we change the default font that was defined at theDocumentlevel as 11 pt Times-Roman to 12 pt Helvetica-Bold. We know that the next line in the txt file will be normal content, so we set the value oftitletofalse(line 9-11). For normal lines, we change the indentation of the first line so that we can easily distinguish the different paragraphs in the text (line 12-14).If the current line is an empty
String, we define a bottom margin of12(line 16) and we change the value oftitleback totrue(line 17), because we know that the next line will be a title; for all other the lines, we reduce the bottom margin of theParagraphto0(line 20).Once all the properties for the
Paragraphare set, we add it to theDocument(line 22).
As you could tell from figure 2.8, iText has rendered the text to PDF page by page in quite a nice way. Now suppose that we want to render the text in two columns, organized side by side on one page. In that case, we need to introduce a DocumentRenderer instance.
Changing the Document renderer
The text in figure 2.8 is rendered using exactly the same Document defaults and exactly the same Paragraph properties as in the previous example. There's one major difference: the text is now rendered in two columns per page.

Figure 2.9: Rendering the text in two columns
To achieve this, we used the ColumnDocumentRenderer class. This is a subclass of the DocumentRenderer class that is used by default. The JekyllHydeV4 example explains how the ColumnDocumentRenderer is created and applied.
float offSet = 36;
float gutter = 23;
float columnWidth = (PageSize.A4.getWidth() - offSet * 2) / 2 - gutter;
float columnHeight = PageSize.A4.getHeight() - offSet * 2;
Rectangle[] columns = {
   new Rectangle(offSet, offSet, columnWidth, columnHeight),
   new Rectangle(
       offSet + columnWidth + gutter, offSet, columnWidth, columnHeight)};
document.setRenderer(new ColumnDocumentRenderer(document, columns));We define an array of Rectangle objects, and we use that array to create a ColumnDocumentRenderer object. We use the setRenderer() method to tell the Document to use this renderer instead of the default DocumentRenderer instance.
If we wanted to organize content in columns in iText 5, we needed to use the ColumnText object. In iText 2, there was a MultiColumnText object that reduced the amount of code that needed to be written to distribute the code over different columns, but this class was removed in iText 5 because of the lack of robustness of MultiColumnText. With the ColumnDocumentRenderer, developers now have a reliable way to create columns without having to write as much code as was needed in iText 5.
While we were at it, we applied a small change to the code that parses the text:
BufferedReader br = new BufferedReader(new FileReader(SRC));
String line;
Paragraph p;
boolean title = true;
AreaBreak nextArea = new AreaBreak(AreaBreakType.NEXT_AREA);
while ((line = br.readLine()) != null) {
    p = new Paragraph(line);
    if (title) {
        p.setFont(bold).setFontSize(12);
        title = false;
   }
   else {
       p.setFirstLineIndent(36);
   }
   if (line.isEmpty()) {
      document.add(nextArea);
       title = true;
   }
   document.add(p);
}
In line 5, we create an AreaBreak object. This is a layout object that terminates the current content area and creates a new one. In this case, we create an AreaBreak of type NEXT_AREA and we introduce it before the start of every new chapter. The effect of this area break is shown in figure 2.10.
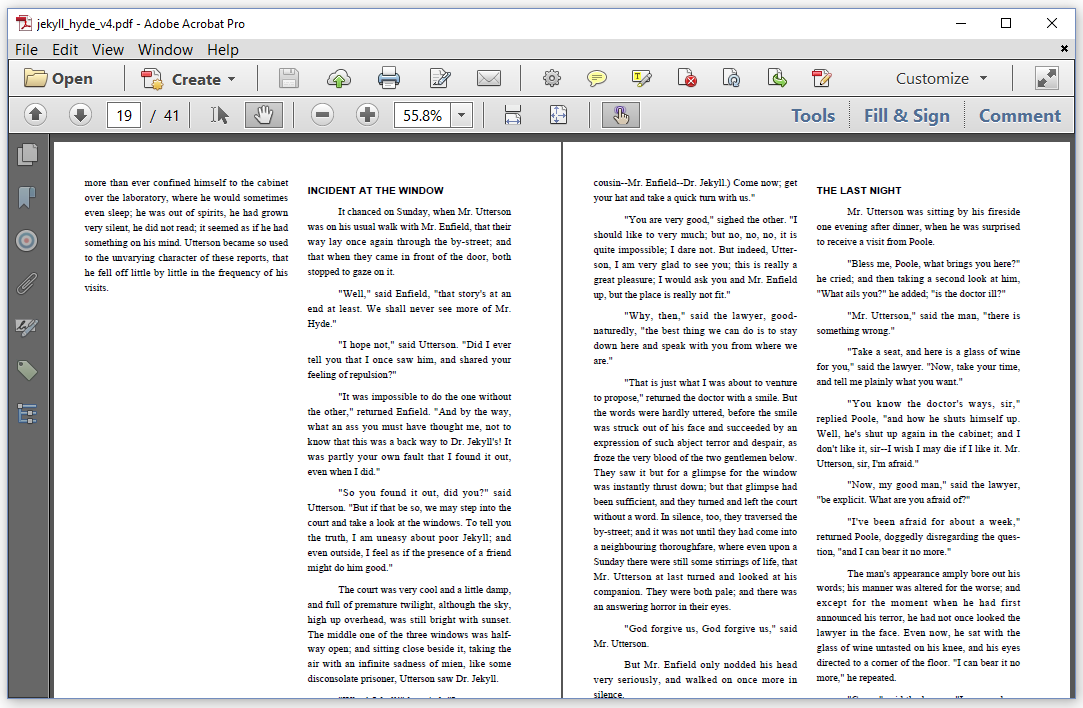
Figure 2.10: The effect of an AreaBreak of type NEXT_AREA
Without the AreaBreak, the chapter "INCIDENT AT THE WINDOW" would have started in the left column of page 19, right after the content of the previous chapter. By introducing the AreaBreak, the new chapter now starts in a new column. If we had used an AreaBreak of type NEXT_PAGE, a new page would have been started; see figure 2.11.
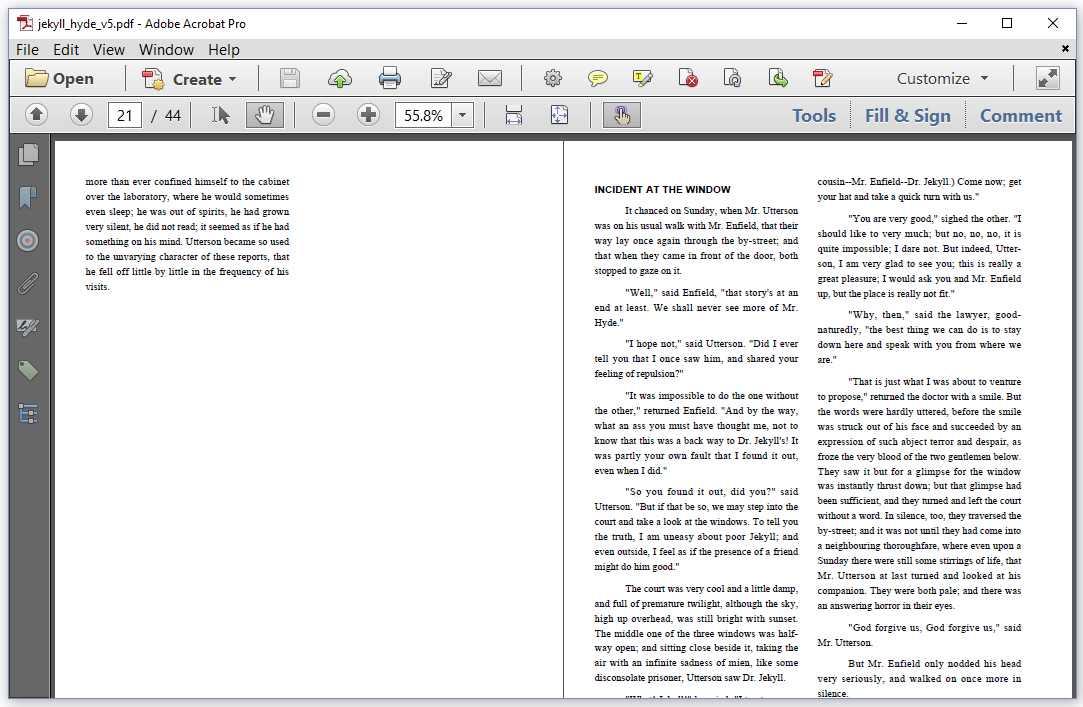
Figure 2.11: The effect of an AreaBreak of type NEXT_PAGE
In the JekyllHydeV5 example, we changed a single line:
AreaBreak nextPage = new AreaBreak(AreaBreakType.NEXT_PAGE);Instead of skipping to the next column, iText now skips to the next page.
By default, the newly created page will have the same page size as the current page. If you want iText to create a page of another size, you can use the constructor that accepts a PageSize object as a parameter. For instance: new AreaBreak(PageSize.A3).
There's also an AreaBreak of type LAST_PAGE. This AreaBreakType is to be used when switching between different renderers.
Switching between different renderers
Figure 2.12 shows a document for which we use the default DocumentRenderer for the first page. Starting with the second page, we introduce a ColumnDocumentRenderer with two columns.
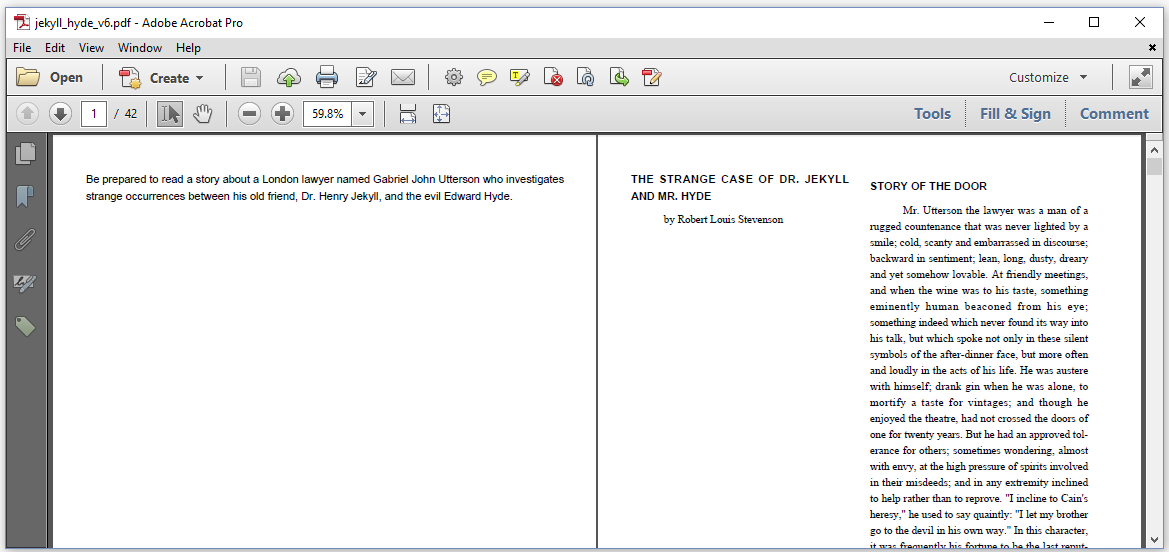
Figure 2.12: Different renderers in the same document
If we look closely at the JekyllHydeV6 example, we see that we switch renderers two times.
public void createPdf(String dest) throws IOException {
    PdfDocument pdf = new PdfDocument(new PdfWriter(dest));
    Document document = new Document(pdf);
    Paragraph p = new Paragraph()
        .add("Be prepared to read a story about a London lawyer "
        + "named Gabriel John Utterson who investigates strange "
        + "occurrences between his old friend, Dr. Henry Jekyll, "
        + "and the evil Edward Hyde.");
    document.add(p);
    document.add(new AreaBreak(AreaBreakType.NEXT_PAGE));
    ... // Define column areas
    document.setRenderer(new ColumnDocumentRenderer(document, columns));
    document.add(new AreaBreak(AreaBreakType.LAST_PAGE));
    ... // Add novel in two columns
    document.add(new AreaBreak(AreaBreakType.NEXT_PAGE));
    document.setRenderer(new DocumentRenderer(document));
    document.add(new AreaBreak(AreaBreakType.LAST_PAGE));
    p = new Paragraph()
       .add("This was the story about the London lawyer "
       + "named Gabriel John Utterson who investigates strange "
       + "occurrences between his old friend, Dr. Henry Jekyll, "
       + "and the evil Edward Hyde. THE END!");
    document.add(p);
    document.close();
}
We add a long Paragraph to the first page (line 4-9). As we didn't define any renderer, the default DocumentRenderer is used. We introduce a page break (line 10) and change the renderer to a ColumnDocumentRenderer with two columns. Right after we set this new renderer, we introduce an AreaBreak that jumps to the last page. Why is this necessary?
Whenever you create a new DocumentRenderer, iText starts returns to the top of the document - that is: from the first page. This allows you to use different renderers on the same document next to each other on the same page. If that is needed, we'll have to instruct iText not to flush the content to the OutputStream; otherwise we won't have access to previous pages. In this case, we don't need to change anything on previous pages. We just want to switch to another renderer on the next page. Introducing a page break that goes to the last page will avoid that new content overwrites old content.
If we would omit document.add(new AreaBreak(AreaBreakType.LAST_PAGE));, then the new content, organized in columns, would be added on the first page, overwriting the long paragraph.
We introduce another page break after we've finished adding the novel (line 15). We change the renderer back to the standard DocumentRenderer (line 17), but we add another LAST_PAGE area break (line 17) before we add another paragraph (line 18-23).
The AreaBreak examples explaining the difference between NEXT_AREA, NEXT_PAGE, and LAST_PAGE have led us somewhat astray. We overlooked an important question we need to ask when rendering PDF: when do we flush the content to the OutputStream?
Flushing the Document renderer
If you look at the API documentation for Canvas, Document, CanvasRenderer, DocumentRenderer and ColumnDocumentRenderer, you'll notice that all of these objects have at least one constructor that accepts a Boolean parameter named immediateFlush. So far, we've never used one of these constructors. As a result, iText always used the default value: true. All the content we've added was always flushed immediately.
In the next three examples, we'll set the value to false. In these three examples, we'll postpone flushing the content for three very specific reasons: to change the layout after content was added, to change the content of objects after they were added, and to add content to previous pages.
In iText 5, content added to a Document was flushed to the OutputStream as soon as a page was full. Once content was added to a page, there was no way to change (the layout of) that content. With iText 7, there's a way to postpone the actual rendering of the content, allowing us to apply changes after the content was added to the Canvas or Document.
Let's return to the example in which we converted text to a PDF document with two columns, more specifically to the example in which we introduced page breaks before every new chapter. These page breaks result in different pages having only one column. As we can tell from figure 2.11, this column is on the right side of the page.
Now suppose that we want to move these solitary columns to the middle of the page as shown in figure 2.13.
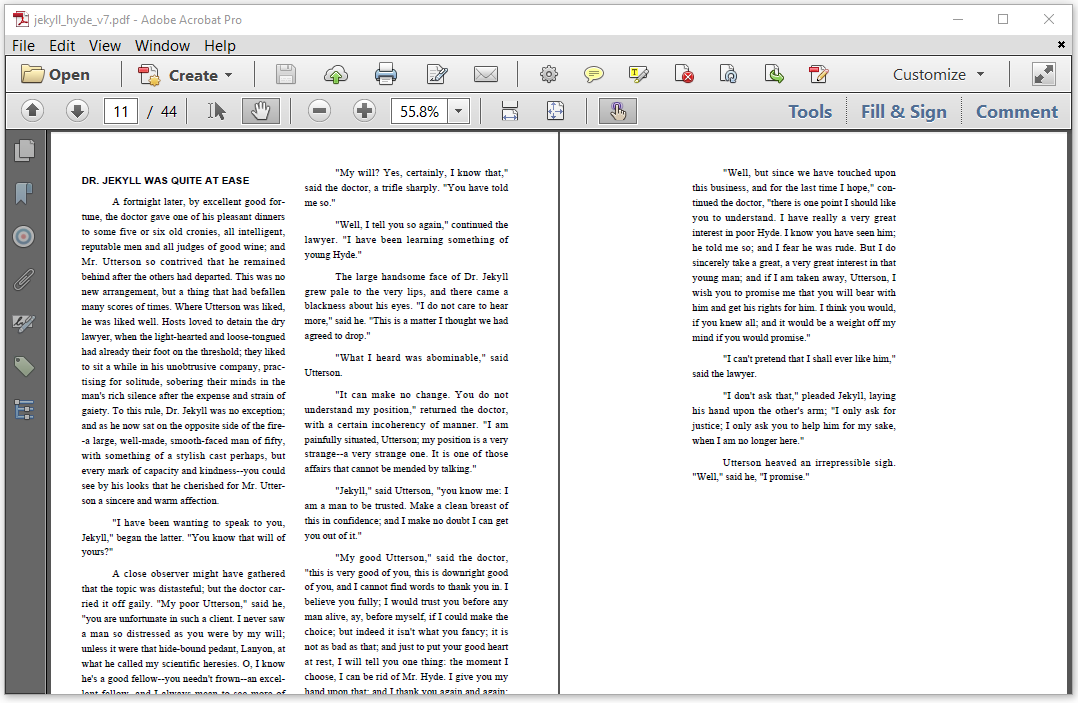
Figure 2.13: Moving a column to the middle of the page
We can't tell in advance when this situation will occur. We parse the text line by line, and we don't know what the next line will bring us when we add a Paragraph to the document. It could be another Paragraph or a LineBreak. This means that we shouldn't render the content right away. If we did, we couldn't move it to the middle if a chapter ends somewhere in the left column. We need to postpone flushing. We can do so in the renderer as demonstrated in the JekyllHydeV7 example.
In this example, we took the code of the ColumnDocumentRenderer class and we adapted it to our specific needs.
class MyColumnRenderer extends DocumentRenderer {
    protected int nextAreaNumber;
    protected final Rectangle[] columns;
    protected int currentAreaNumber;
    protected Set moveColumn = new HashSet();

    public MyColumnRenderer(Document document, Rectangle[] columns) {
        super(document, false);
        this.columns = columns;
    }

    @Override
    protected LayoutArea updateCurrentArea(LayoutResult overflowResult) {
        if (overflowResult != null
            && overflowResult.getAreaBreak() != null
            && overflowResult.getAreaBreak().getType()
                != AreaBreakType.NEXT_AREA) {
            nextAreaNumber = 0;
        }
        if (nextAreaNumber % columns.length == 0) {
            super.updateCurrentArea(overflowResult);
        }
        currentAreaNumber = nextAreaNumber + 1;
        return (currentArea = new LayoutArea(currentPageNumber,
            columns[nextAreaNumber++ % columns.length].clone()));
    }

    @Override
    protected PageSize addNewPage(PageSize customPageSize) {
        if (currentAreaNumber != nextAreaNumber
            && currentAreaNumber % columns.length != 0)
            moveColumn.add(currentPageNumber - 1);
        return super.addNewPage(customPageSize);
    }

    @Override
    protected void flushSingleRenderer(IRenderer resultRenderer) {
        int pageNum = resultRenderer.getOccupiedArea().getPageNumber();
        if (moveColumn.contains(pageNum)) {
           resultRenderer.move(columns[0].getWidth() / 2, 0);
        }
        super.flushSingleRenderer(resultRenderer);
    }
}
Let's take a closer look at this custom DocumentRenderer:
Line 2-5: we reuse two member-variables from the
ColumnDocumentRenderer: thenextAreaNumberinteger keeps track of the column count; thecolumnsarray stores the position and dimension of each column. We add an extra integercurrentAreaNumberthat remembers the current column count and amoveColumncollection in which we'll store the page numbers of the pages with a single column.Line 7-9: we construct a
MyColumnRendererinstance. We call the constructor of theDocumentRenderersuperclass and set theimmediateFlushparameter tofalse: content will not be flushed immediately.Line 12-26: the
updateCurrentArea()method is identical to the method with the same name in theColumnDocumentRendererclass, except for one tiny difference: we set the value ofcurrentAreaNumbertonextAreaNumber + 1. This method is called each time a new column is started. Note that thecurrentAreaNumberis set to0each time a page break is introduced.Line 28-34: we override the
newPage()method. This method is triggered every time a new page is started. Whether or not the content was rendered to the previous page, depends on the value ofimmediateFlush. We use this method to check if the previous page consisted of only one column. This is the case ifcurrentAreaNumberandnextAreaNumberaren't equal and if the value ofcurrentAreaNumberis odd (this assumes thatcolumnsis an array with only two elements). If there's only one column in the previous page, we add the page number of that page (currentPageNumber - 1) to themoveColumnscollection.Line 36-43: we override the
flushSingleRenderer()method. This is the method that renders the content. IfimmediateFlushistrue, this method is called automatically. IfimmediateFlushisfalse, we have to trigger the rendering process ourselves. We override this method because we want to move the coordinates of theIRendererto the right with half a column width for every page we registered as a single-column page in thenewPage()method.
Now let's take a look at how we can use this custom column renderer.
Rectangle[] columns = {
   new Rectangle(offSet, offSet, columnWidth, columnHeight),
   new Rectangle(
       offSet + columnWidth + gutter, offSet, columnWidth, columnHeight)};
DocumentRenderer renderer = new MyColumnRenderer(document, columns);
document.setRenderer(renderer);
We define an array with two Rectangle objects. We use this array to create an instance of our custom MyColumnRenderer object. We use this instance as the renderer for our Document. The rest of our code is identical to what we had before: we set the default values for the Document; then we parse the text file and we add content while doing so.
If we would close the document object after adding all the content, we'd end up with a document that consists of nothing but empty pages. In our renderer, we jump from area to area, and we create new page after new page, but we aren't rendering anything because the flushSingleRenderer() method is never called. We have to trigger this method ourselves, and we can do so like this:
renderer.flush();
document.close();
When we flush() the renderer, all the content we've been adding without flushing will be rendered. The flushSingleRenderer() method will be called as many times as there are objects added to the Document. Every time it's called on a page marked as a single-column page, the content will be moved to the right so that the column appears in the middle of the page.
This is one of the more complex examples in this book. Writing your own RootRenderer implementation isn't easy, but this functionality gives you a lot of power to create PDF documents the way you want to, as opposed to the way iText wants to.
Let's continue with a couple of examples in which we use the immediateFlush parameter when creating a Document instance.
Changing content that was previously added
Take a close look at figure 2.14. At first sight, it isn't all that different from examples we've seen before, but there's something special about the first line of text.
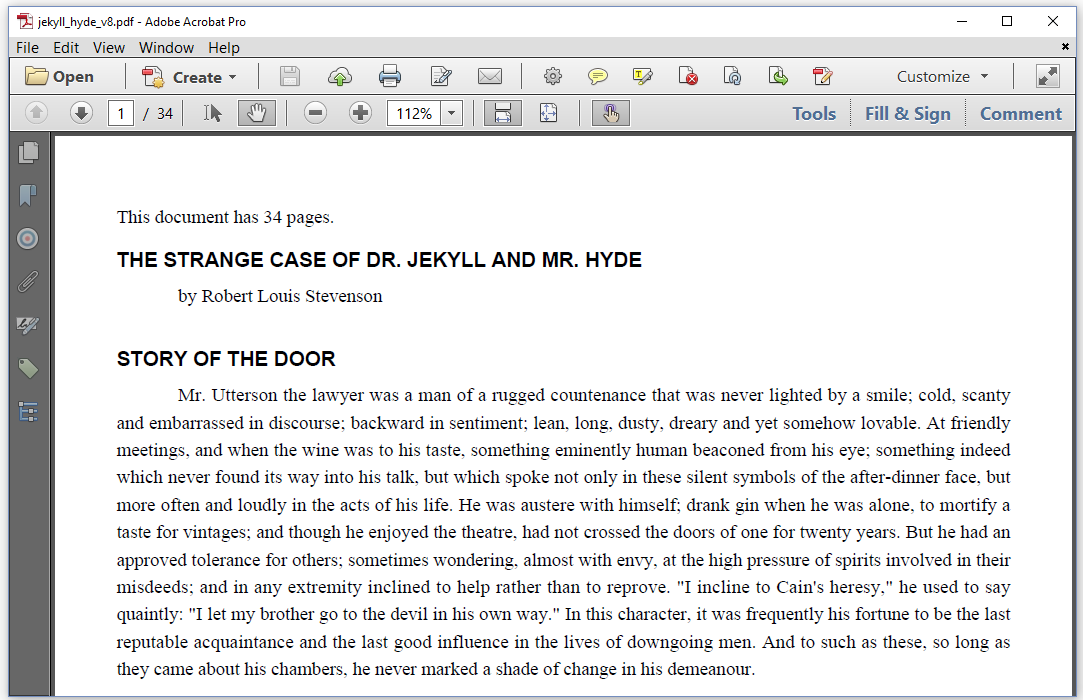
Figure 2.14: Start by showing the total number of pages
The first line of text says "This document has 34 pages." From previous examples, we know that we're building a document as we go, reading a text file line by line. When we parse the first lines of text, there is no way we can predict how many pages will be needed for the full document. How did we guess that we'd end up with 34 pages?
Truth be told, we didn't have to guess; we used a little trick. The JekyllHydeV8 example reveals the magic we used. We created a Document instance with the immediateFlush parameter set to false.
Document document = new Document(pdf, PageSize.A4, false);The first object we add to this document is some text saying "This document has {totalpages} pages."
Text totalPages = new Text("This document has {totalpages} pages.");
IRenderer renderer = new TextRenderer(totalPages);
totalPages.setNextRenderer(renderer);
document.add(new Paragraph(totalPages));
As you can see, we used a placeholder {totalpages} for the total number of pages. We created a TextRenderer instance and added this renderer as the next renderer for the Text object. We wrap the Text object in a Paragraph and add this paragraph to the document. Then we add all story of Dr. Jekyll and Mr. Hyde. Because of the fact that immediateFlush is false, no text will be rendered until at the very last moment. This very last moment could be when we close the document, in which case the first line would still read "This document has {totalpages} pages."
Obviously, that's not what we want. We want to change {totalpage} into the actual number of pages before the text is rendered. This can be achieved using the TextRenderer object.
String total = renderer.toString().replace("{totalpages}",
   String.valueOf(pdf.getNumberOfPages()));
((TextRenderer)renderer).setText(total);
((Text)renderer.getModelElement()).setNextRenderer(renderer);
document.relayout();
document.close();
In line 1-2, we change the String "This document has {totalpages} pages." to "This document has 34 pages." As you can see, we can retrieve the original content of the Text object from the renderer and we replace the placeholder with pdf.getNumberOfPages(). In line 3-4, we change the text of the TextRenderer and we add this altered text renderer to the Text object.
If we would close the document after line 4, the PDF would still show "This document has {totalpages} pages." For the change to take effect, we need to re-layout the document. This is done using the relayout() method in line 5. Only after the layout has been recreated, we can close the document, as is done in line 6.
In iText 5, we could have achieved more or less the same result by adding a placeholder with fixed dimensions. Once the complete document was rendered, we could then fill out the total number of pages on the placeholder. We will use the same approach with iText 7 in chapter 7, but iText 7 now also provides an alternative solution by allowing us to change the content of a Text object and then recreate the layout.
Changing the content of a Text object is still somewhat complex. There are many cases where we don't need to recreate the layout. In those cases, the complexity can be reduced substantially as demonstrated in the next example.
Adding a Page X of Y footer
In figure 2.15, we see that each page has a footer that indicates the current number and the total number of pages.
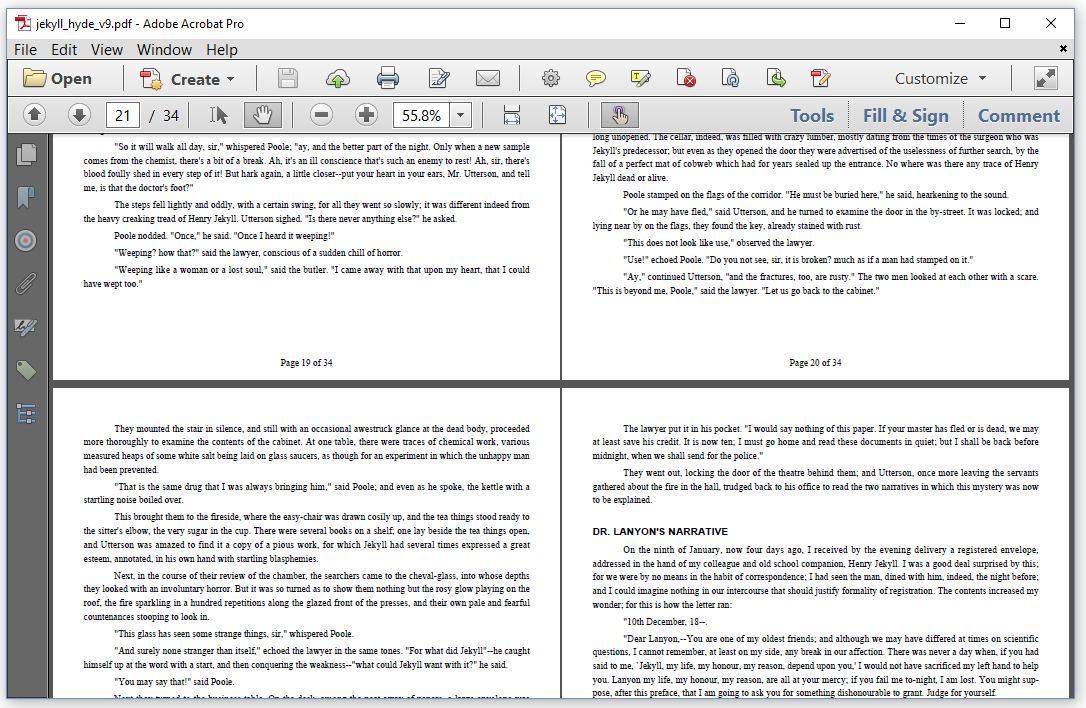
Figure 2.15: Page X of Y footer
To achieve this, we used a much easier approach than what we did in the previous example. Let's take a look at the JekyllHydeV9 example.
Once more, we tell the Document that it shouldn't flush its content immediately.
Document document = new Document(pdf, PageSize.A4, false); After adding the complete text of the short story by Robert Louis Stevenson, we loop over every page in the document and we add a Paragraph to each page.
int n = pdf.getNumberOfPages();
Paragraph footer;
for (int page = 1; page <= n; page++) {
   footer = new Paragraph(String.format("Page %s of %s", page, n));
   document.showTextAligned(footer, 297.5f, 20, page,
       TextAlignment.CENTER, VerticalAlignment.MIDDLE, 0);
}
document.close();
The showTextAligned() method can be used to add text at an absolute position on any page, using a specific horizontal and vertical alignment with respect to the chosen coordinate, and using a specific angle.
In this case, we loop over all the pages (from 1 to 34) and we add a line of text centered vertically and horizontally at position x = 297.5f and y = 20 on every page. We didn't need to change the layout of any of the content that was already added, hence we don't need to use the relayout() method. All of the content is rendered at the moment we close() the document.
This example only works if you set immediateFlush to false. If you forget setting this parameter, you'll encounter the following exception:
Exception in thread "main" java.lang.NullPointerException at com.itextpdf.kernel.pdf.PdfDictionary.get(PdfDictionary.java)
This exception occurs because you are trying to change the contents of a page dictionary that has already been flushed to the OutputStream. iText still has a reference to that page dictionary, but the dictionary as such is no longer there, hence the NullPointerException.
Why didn't we get a NullPointerException in our low-level CanvasReturn example?
In the CanvasReturn example, we created PdfPage objects. As we are using low-level functionality, it is our responsibility to manage the resources. We can use the flush() method on a PdfPage object of a finished page to flush its content to the OutputStream. Once this is done, we can no longer add anything to that page. We'll get a NullPointerException if we try to get (one of) its content stream(s).
Let's take a look at some more showTextAligned() examples.
Adding text with showTextAligned
Different showTextAligned() methods are available in the RootElement class. These methods can be used in the Canvas and the Document object to put a single line of text at an absolute position. If this line of text doesn't fit the Canvas or if it doesn't fit the current page of the Document, it won't be split into different lines. It might even run off the page, outside the visible area of that page.
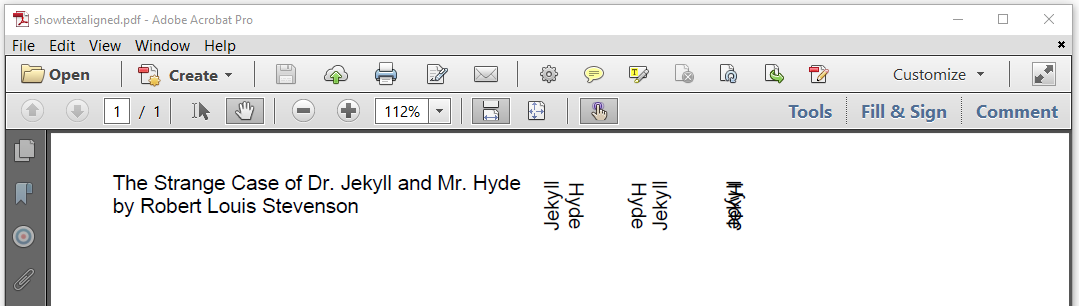
Figure 2.16: Text added at absolute positions
The PDF shown in figure 2.16 was created with the ShowTextAligned example.
Paragraph title = new Paragraph("The Strange Case of Dr. Jekyll and Mr. Hyde");
document.showTextAligned(title, 36, 806, TextAlignment.LEFT);
Paragraph author = new Paragraph("by Robert Louis Stevenson");
document.showTextAligned(author, 36, 806,
    TextAlignment.LEFT, VerticalAlignment.TOP);
document.showTextAligned("Jekyll", 300, 800,
    TextAlignment.CENTER, 0.5f * (float)Math.PI);
document.showTextAligned("Hyde", 300, 800,
   TextAlignment.CENTER, -0.5f * (float)Math.PI);
document.showTextAligned("Jekyll", 350, 800,
   TextAlignment.CENTER, VerticalAlignment.TOP, 0.5f * (float)Math.PI);
document.showTextAligned("Hyde", 350, 800,
   TextAlignment.CENTER, VerticalAlignment.TOP, -0.5f * (float)Math.PI);
document.showTextAligned("Jekyll", 400, 800,
   TextAlignment.CENTER, VerticalAlignment.MIDDLE, 0.5f * (float)Math.PI);
document.showTextAligned("Hyde", 400, 800,
   TextAlignment.CENTER, VerticalAlignment.MIDDLE, -0.5f * (float)Math.PI);
In line 1 and 3, we create two Paragraph objects. We add these objects to the current page using the showTextAligned() method.
In line 2, we add the
Paragraphat positionx = 36; y = 806and we align the content to the left of this coordinate. We didn't define a vertical alignment. The defaultVerticalAlignment.BOTTOMwill be used, which means that the coordinate will be considered as the bottom coordinate of the content.In line 4-5, we add the content at the exact same coordinate, but we define a different value for the vertical alignment:
VerticalAlignment.TOP. Now the coordinate is considered as the top coordinate of the content.
In lines 6 to 17, we add text as a String instead of as a Paragraph. We also introduce rotation values of 90 degrees (0.5f * (float)Math.PI) and -90 degrees
In lines 6-9, we add two names at the same coordinate, but with a different rotation angle. We do the same in lines 10-13. Notice the difference between the apparent order in which the names "Jekyll" and "Hyde" appear depending on the value of the
VerticalAlignment(as we introduce a rotation of 90 degrees, vertical becomes horizontal, and vice-versa).In lines 14-17, we add both names at the same coordinate with a different angle, but with
VerticalAlignment.MIDDLE. The names are written on top of each other and have become almost illegible.
This example demonstrates the different variations of showTextAligned() methods. There's also a showTextAlignedKerned() method, but we need to learn more about using iText Core add-ons before we can use that method in an example.
Using iText Core add-ons
The iText Core libraries are available as open source software under the AGPL license. This means that you can use iText in your applications without having to pay a license fee as long as you distribute your own software based on iText under the same license. To put it simply: you can use iText for free if you also make your own source code available for free. The moment you distribute your code under another license –for instance: you work for a customer who uses your code in a closed source environment–, you or your customer have to purchase a commercial license.
There's more to it, but it would lead us too far to discuss the AGPL; this is a technical tutorial, not a book of law.
Many developers aren't aware of the implications of using AGPL software. This can be very annoying for many different reasons. These are some examples of such annoyances:
Companies at the verge of getting funding or being acquired, fail the due diligence process because they don't have a commercial license for their use of iText.
iText Group successfully sued a company for blatant abuse of our intellectual property as an example proving that the AGPL can be enforced. The case was won in about one and a half months. That was fast, but at iText Group, we all agree that there are better ways to spend our time than by going to court because some company wrongly assumes that open source software is software that is free of obligations and free of charge.
Some companies ignore the implications of the AGPL license deliberately. This leads to unfair competition between customers who buy a commercial license, allowing us to invest in further development, and users who benefit from the further development, refusing to contribute in any way.
To create more awareness and to avoid misunderstandings, we decided to make part of iText closed source. We've defined a series of valuable add-ons that won't be available as open source software. We used to work with a dual licensing model and we'll continue to do so, but now we're also using the open core model. If developers want to use the functionality that is only available in a closed source add-on, a commercial license will have to be purchased.
The pdfCalligraph module (aka the typography jar) is one example of such a closed source add-on. We've spent a lot of time and effort into improving the typography. With pdfCalligraph, iText finally supports Indic writing systems such as Devanagari and Tamil. iText now also supports special features such as the visualization of vowels in Arabic. All of this functionality is available in a separate typography jar.
You can use the pdfCalligraph add-on by introducing the following dependency:
<dependency>
   <groupId>com.itextpdf</groupId>
   <artifactId>typography</artifactId>
   <version>1.0.0</version>
   <scope>compile</scope>
</dependency>
This add-on is closed source, and as such, it is not available on Maven Central Repository. You have to obtain it from the iText repository. You'll need to add this repository to your POM file:
<repositories>
   <repository>
       <id>central</id>
       <name>iText Repository-releases</name>
       <url>https://repo.itextsupport.com/releases</url>
   </repository>
</repositories>
When importing a closed source add-on, you need a license-key in order to use that add-on. You need the itext-licensekey jar to import that key into your code. This is the dependency for the license-key jar:
<dependency>
    <groupId>com.itextpdf</groupId>
    <artifactId>itext-licensekey</artifactId>
    <version>2.0.0</version>
  <scope>compile</scope>
</dependency>
Loading the license key into your code is done like this:
LicenseKey.loadLicenseFile(new FileInputStream(KEY));In my case, the KEY value is a constant with the path to my personal license key for using the typography jar.
If you introduce an add-on, but you forget adding the line using the loadLicenseFile() method, you'll run into the following exception:
Exception in thread "main" java.lang.RuntimeException: java.lang.reflect.InvocationTargetException ... Caused by: com.itextpdf.licensekey.LicenseKeyException: License file not loaded.
If you try to load the license key, but it's missing, the following exception will be thrown:
Exception in thread "main" java.io.FileNotFoundException:itextkey.xml (The system cannot find the path specified)
If the key was found at this location, but it was corrupted, you'll get this LicenseKeyException:
Exception in thread "main" com.itextpdf.licensekey.LicenseKeyException: Signature was corrupted.
If you are using a license key that is expired, you'll get yet another message:
Exception in thread "main" com.itextpdf.licensekey.LicenseKeyException: License expired.
These are the most common exceptions that can occur. Usually, a verbose message will tell you what went wrong. In the next example, we're going to use the typography jar to introduce kerning.
Improving the typography
Figure 2.17 shows the difference between text without kerning and text with kerning.
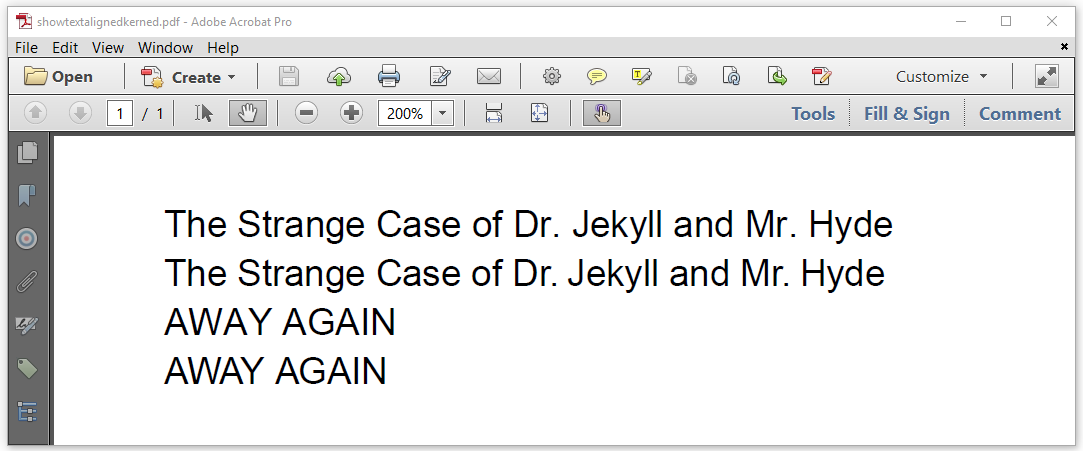
Figure 2.17: Kerned text
The kerning mechanism isn't that obvious in the title of Stevenson's short story. The devil is in the details: the . after Dr and Mr has been slightly moved in the kerned line. When kerning is active, the font program is consulted for kerning information. In this case, the font program knows that when a combination of r and . is encountered, the . should moved closer to the r.
The mechanism is easier to spot in the word "AWAY". In the kerned version, the A characters move closer to the W on both sides. The distance between the A and the Y has also been reduced. The ShowTextAlignedKerned example demonstrates how we used the showTextAlignedKerned() method to achieve this.
document.showTextAligned(
   "The Strange Case of Dr. Jekyll and Mr. Hyde", 36, 806, TextAlignment.LEFT);
document.showTextAlignedKerned(
   "The Strange Case of Dr. Jekyll and Mr. Hyde", 36, 790,
   TextAlignment.LEFT, VerticalAlignment.BOTTOM, 0);
document.showTextAligned("AWAY AGAIN", 36, 774, TextAlignment.LEFT);
document.showTextAlignedKerned("AWAY AGAIN", 36, 758,
    TextAlignment.LEFT, VerticalAlignment.BOTTOM, 0);
The pdfCalligraph add-on is made an optional one because improved typography requires more extensive processing power to examine character combinations and to look up if the font program contains kerning or ligature information for these combinations.
In iText 5, R2L script was supported, but only in the context of ColumnText and PdfPCell. You had to change the writing system explicitly. Ligatures were supported, but only in Arabic text. There was no support for Hindi or other Indic writing systems whatsoever. With iText 7 and iText 8, it's sufficient to add the typography jar to the CLASSPATH. As soon as iText Core detects the pdfCalligraph add-on, the writing system will be automatically changed from left to right (L2R) to right to left (R2L) if Hebrew or Arabic is detected. When Devanagari or Tamil content is detected, ligatures will be made automatically.
All of this extra work may be overkill for straightforward English text, in which case you don't really need the pdfCalligraph add-on.
I have tried using kerning / support for Arabic, Indic languages / ligatures, but it doesn't work. Why not?
The showTextAlignedKerned() method won't have any effect if you don't have the typography jar in your CLASSPATH. If the typography jar is missing, there will be no difference between the normal text and the kerned text. If you want to render Hindi or Arabic, the text will be rendered incorrectly without the typography jar. Ligatures won't be made unless you add the typography jar to your CLASSPATH.
Currently not all writing systems are supported. We started with Arabic, Devanagari and Tamil. Support for other writing systems will follow depending on what iText customers request.
We could continue with many more examples involving pdfCalligraph and typography, but we'll leave that for another tutorial. This chapter was about the RootElement objects Canvas and Document, and we've covered quite some ground.
Summary
In this chapter, we discussed the Canvas and the Document object, both subclasses of the abstract RootElement class. We also made some examples with the corresponding RootRenderer classes, CanvasRenderer and DocumentRenderer. While doing so, we discovered that we can easily render content in columns using the ColumnDocumentRenderer. The column examples allowed us to learn more about the AreaBreak object, which is a subclass of the abstract AbstractElement class.
We rendered the text of the short story "The Strange Case of Dr. Jekyll and Mr. Hyde" many times tweaking different properties of the Document object. We learned that content is flushed to the OutputStream as soon as possible by default, but that we can ask iText to postpone the rendering of elements so that we can change their content or layout afterwards.
Finally, we discussed the mechanism of closed source add-ons for iText Core. These add-ons require a license key that needs to be purchased from iText Software. We've experimented with the pdfCalligraph add-on also known as the typography jar. In the next chapter, we'll dig into the ILeafElement implementations. We've already used the Text object many times, but in the next chapter, we'll also take a look at the Link, Tab and Image object.